Showing posts with label hide. Show all posts
Showing posts with label hide. Show all posts
Tuesday, May 23, 2017
How to Hide a Folder or File
How to Hide a Folder or File
How to Hide a Folder or File
Making a file or folder hidden is an easy way to add a small amount of security to your files, and can also be a good way to clean up some clutter in your file browser. Follow this guide to hide files in any operating system.
Method 1:- Windows
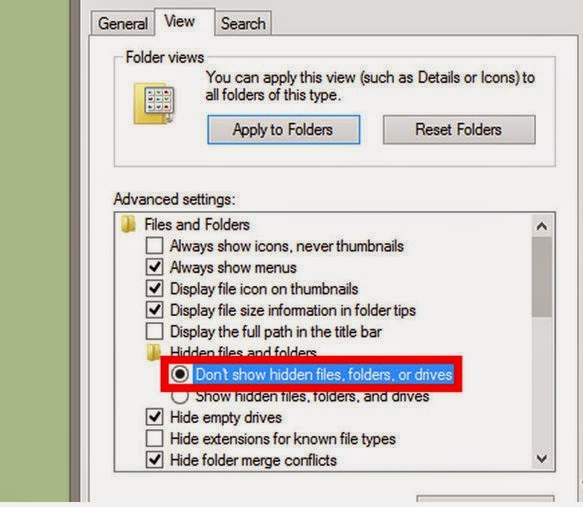
1.Set folder settings. To make sure that hidden files do not show up, hidden files need to be set to hidden in the Folder Options.
- In Windows XP, click Tools then Folder Options… in Windows Explorer. Click the View tab and under Advanced settings make sure that “Do not show hidden files and folders” is selected.
- In Windows Vista and Windows 7, click Organize in Windows Explorer, then Folder and Search Options. Click the View tab and under Advanced settings make sure that “Do not show hidden files and folders” is selected.
- In Windows 8, click the Options menu in the top-right corner of the window and select “Change folder and search options.” Click the View tab and under Advanced settings make sure that “Do not show hidden files, folders, and drives” is selected.

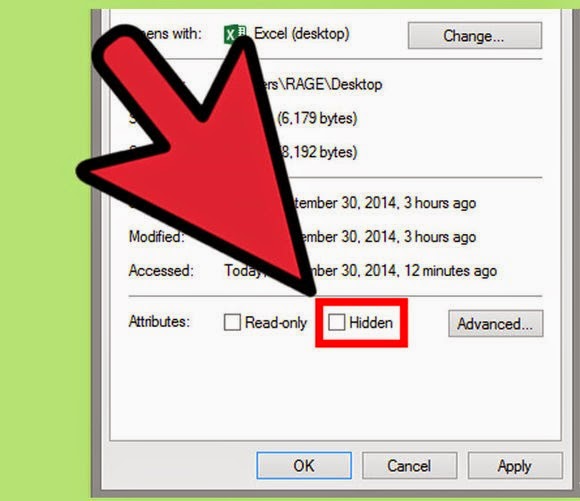
2.Navigate to the file or folder. Right-click on the file or folder and select Properties from the menu. In the General tab, check the Hidden box at the bottom. Click Apply and the OK.
3.Unhide the file or folder. Open Folder Options and select “Show hidden files and folders.” Navigate to your hidden file or folder. It will appear grayed-out to designate that it is hidden. Right-click it and uncheck the Hidden box in the Properties window.
Method 2:- Mac OS X
1.Open Terminal. Type “chflags hidden” then drag the file or folder that you want to hide into the terminal. The location of the file will be entered in after the command you typed. Press return to hide the file.
2.Unhide the file. To unhide the file, type “chflags unhidden <file name and location>” into the Terminal. You must specific the location of the file as well as its name and extension. If hidden files are set to be viewable, then you can drag the file as you did in the first step.
3.Show hidden files. To see hidden files in the Finder, open the terminal and type “defaults write com.apple.Finder AppleShowAllFiles TRUE.” This will make all files visible. To set hidden folders back to invisible, type “defaults write com.apple.Finder AppleShowAllFiles FALSE.”
- You can make a file or folder invisible in Mac or Linux by adding a “.” to the front of a filename. In the terminal type “mv sample.txt .sample.txt”. This will rename the file so that it cannot be seen.
Method 3:- MS-DOS
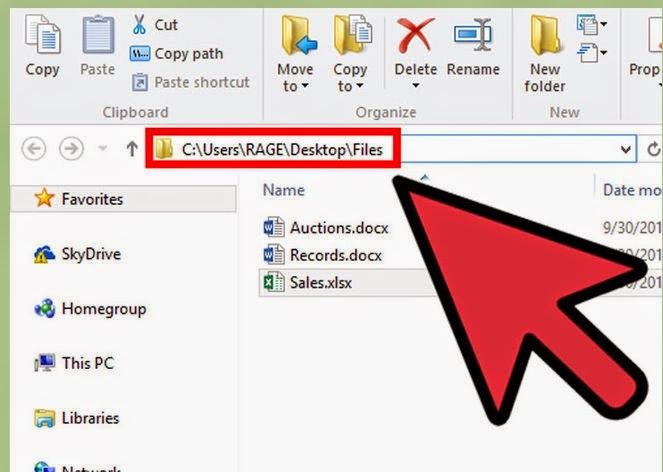
1.Locate the file or folder you want to hide. You will need to type the full path of the file when you hide it.
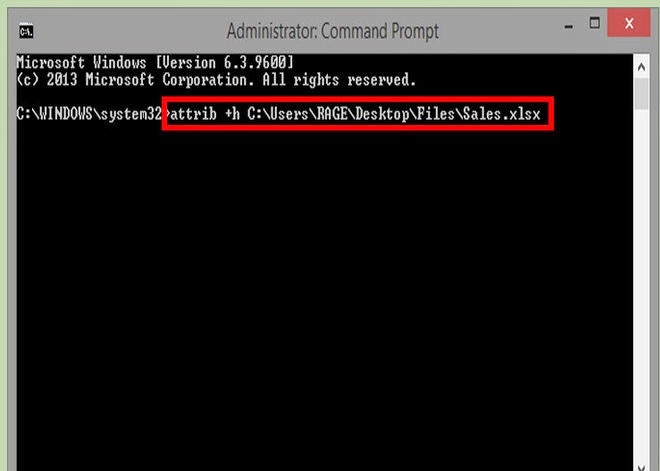
2.Change the attribute. Type “attrib +h c:examplesample.txt”. This will make the file hidden. To unhide the file, type “attrib –h c:examplesample.txt”.
Available link for download
Monday, May 22, 2017
computer me folder ko hide lock kaise kare
computer me folder ko hide lock kaise kare
computer me folder ko hide-lock kaise kare
hello dosto aaj hum ye janenge ki apne computer me folder ko hide kaise karte hai aaj tak sayad hi koi aadmi is tricks ko janta hoga ki folder ko hide kaise karte hai hide karne ke liye hame computer me hum icon ko change karte hai aur bina naam ka folder banate hai to chaliye step-by-step batata hu

computer me bina naam ke folder kaise banaye?
step 1: computer me bina naam ke folder banane ke liye ek koi bhi kahi bhi folder banaye
step 2: ab usko rename karke uske sare words ko khatam karde phir right click karde
step 3: uske bad aap insert Unicode control character par click karke LRM par click karde

ab aapka folder bina kisi word ka ho jayega ab aap bhi jan chuke honge ki bina kisi naam ke folder kaise banate hai agar aap kisi folder ko bina kisi naam ke bhi banana chahte hai to aap is tarah bana sakte hai
Hidden icon kaise banaye computer ke liye?
ab hum ye janlete hai ki computer ke liye hidden icon kaise select karte hai ye is liye jaruri hota hai ki jub aap computer me folder ko hide karege to aapka folder ka naam bhi naa dikhe aur aapke folder ka icon bhi naa dikhe jisse aapka folder fully hide ho sakte
step 1: aap kahi bhi ek folder banaye phir usper right click kare uske bad properties par click karde
step 2: ab customize par click karke change icon par click kare yaha se koi hidden icon select kare jaise maine kiya hai
aap is photo dekh sakte hai ki yaha par sirf white colour hi dikh raha hai matlanb ye hidden icon hai isko select karde
step 3: ab aapko ok buttom par click karde phir apply par click karde ab aapka dono kam ho gaya folder bina naam ka bhi ho gaya aur icon bhi hide ho gaya
ab aap khud hi dekh sakte hai ki aapka folder fully hide ho chukka hai
computer me folder ko lock kaise kare?

ab mai aapko ye bataunga ki folder par aap password kaise laga sakte hai wo isliye agar aap apne folder ko password se protect karna chahte hai taki aap hi us folder ko open kar sake to aaeye hum step by step jante hai folder ko lock karne ke liye
step 1: sabse pehle mai aapko bata du ki folder ko lock karne ke liye hamare pass winzip app compter me install hona chahiye
step 2: ab aap us folder ko select kare jisko aap lock karna chahte hai aur right click karde
step 3: uske bad aap zipfile ke option me jaker add to zipfile par click kare ya compressed zip par click kare

step 4: ab aapka folder zipfile me ho jayega ab aap apne original folder ko delet karde uske bad aap zipfile wale folder ko open kare
step 5: uske bad aap set password ya encrypt ke option me jaker password set karde
ab aapka folder password me ho jayega
ALSO READ
MOBILE SE DAILY 200 SE JYADA KAMAYE JANIYE KAISE
AGAR AAP APNE LIYE WEBSITE BANANA CHAHTE HAI FREE ME TO AAP YAHA CLICK KARE
AGAR AAPKA COMPUTER SLOW HAI TO FAST KARNE KA TARIKA JANNE KE LIYE YAHA CLICK KARE
AUR AGAR AAP ANDROID MOBILE KA TRICKS PANA CHAHTE HAI TO YAHA CLICK KARE
HAA TO TO DOSTO UMMID KARTA HU KI YE TRICK AAPKO BAHUT PASAND AAYA HOGA AGAR KOI DIKKAT AATI HAI TO AAP HAME COMMENT ME PUCH SAKTE HAI
MERE POST AAPKO PASAND AAYA HAI TO LIKE MERE WEBSITE KO LIKE JARUR KARE AUR AISE TRICKS AGAR AAP APNE IMEL DWARA PANA CHAHTE HAI TO AAP IS SITE KO SUBSCRIBE BHI KAR SAKTE HAI
Available link for download
Sunday, May 21, 2017
How to Hide Formulas in Microsoft Excel
How to Hide Formulas in Microsoft Excel
How to Hide Formulas in Microsoft Excel
Formulas are one of the main features of Excel. It allows users to format and create conditions in their documents to easily calculate data entered in any cells. If you’re creating important Excel files where data integrity is a must (such as balance sheets, monetary records, and more), hiding formulas of your document, away from unwanted or accidental editing, is one way you can keep your Excel file accurate and secure.
Hiding Formulas

1.Open the Excel file you want to edit or hide its formulas. Double-click on the file to open it in Microsoft Excel.

2.Click the cell that contains the formula you want to hide. You’ll notice that the cell’s formula and data will be displayed on the Formula Bar, right on top of the Excel spreadsheet.

3.Click on the “Format” button. This is found on the toolbar menu at the upper-right part of the window. A drop-down menu containing a list of formatting options will be displayed.
- For older versions of MS Excel (Office 2003 and earlier), the “Format” button is located on the Menu bar (upper-left area) of the Excel window.
4.Select “Format Cells” from the drop-down list. The Format Cells window will open.

5.Hide the formulas. Click on the “Protection” tab (right-most tab on the window) and put a check on the box beside “Hidden.” Click on “OK” when you’re done.
- This option hides formulas of cells when the spreadsheet is set as “Protected.” You’ll notice that after setting the option to hide the formulas, the formula still shows on the Formula Bar, this is because the spreadsheet still hasn’t been set as protected.
Available link for download
Monday, March 20, 2017
How to Hide Last Seen on WhatsApp In Smart Phone Step By Step
How to Hide Last Seen on WhatsApp In Smart Phone Step By Step
How to Hide Last Seen on WhatsApp In Smart Phone
Lots of smart phone users used the WhatsApp instant messaging application in the smart phone. The WhatsApp instant messaging application is very popular app in all our world. WhatsApp Application is very is to use for all person like news user.
In this post (Tutorial) you learn about How to Hide Last Seen on WhatsApp In Smart Phone step by step with image and How do configure privacy settings on Whatsapp App In Smart Phone. WhatsApp application only for download in smart phone only like Android, iPhone, Windows Phone, Nokia S40, BlackBerry, Nokia S60, BlackBerry 10.
How do configure privacy settings on Whatsapp App In Smart Phone Step By Step With Image
The WhatsApp instant messaging application set the privacy settings automatically for all users like Android, iPhone, Windows Phone, Nokia S40, BlackBerry, Nokia S60, BlackBerry 10. The WhatsApp privacy settings available to changeable like last seen, profile photo and status. But never change or hide your online or typing status in the all smart phone on whatsapp.In this tutorial you know about hide or change the "last seen" privacy setting in WhatsApp instant messaging Application. The WhatsApp instant messaging service provider has been categorized in three types to hide the last seen time in privacy settings on Whatsapp in all type of smart phone step by step.
1. 1st Type Of "Last Seen" privacy setting in WhatsApp
Everyone - In this option last seen show or visible for all WhatsApp users.
2. 2nd Type Of "Last Seen" privacy setting in WhatsApp
My contacts - In this option last seen show or visible for only your WhatsApp contact list.
3. 2nd Type Of "Last Seen" privacy setting in WhatsApp
Nobody - In this option last seen hide for all whatsapp user in the world and also hide last seen status for your self, means you can not able to see the last seen status of other whatsapp user. But the Online and typing status are visible to all.
In this tutorial you learn how to hide or change the "Last Seen" privacy setting in WhatsApp for android users only step by step with all image. For other user wait for next tutorial.
How to Hide Last Seen on WhatsApp for Android Step By Step With Image
1. First of all click on the whatsapp icon to launch the application.2. Then click on the "menu" option or click on the "3-dots symbol" on the top right-corner.


Last seen privacy settings For iPhone, Windows Phone, Nokia S40, BlackBerry, Nokia S60, BlackBerry 10 given below link.
WhatsApp Last Seen Privacy Setting for iPhone
1. First open Whatsapp app on your iPhone os smart phone.
2. Then tab on setting at the bottom right corner.
3. Now in the setting option you see the "Account" option, click on it.
4. Now click on the pravacy setting and then click on last seen option.
5. Now choose one last seen privacy in these three privacy Everyone (visible to all), My contacts ( visible for WhatsApp contacts ony) or Nobody (No one can see their Last Seen info and you also).
WhatsApp Last Seen Privacy Setting for BlackBerry 7 OS
1. Launch whatsapp.
2. go to settings by click on gear wheel symbol/ pencil symbol.
3. now tab on Privacy Settings show after System Profiles.
4. now click on the Last Seen and select Everyone, My contacts and Nobody.
WhatsApp Last Seen Privacy Setting for BlackBerry 10
Launch whatsapp - Tap on Settings - click on Privacy Settings - and then click on Last Seen option and select Everyone (visible to all), My contacts ( visible for WhatsApp contacts ony) or Nobody (No one can see their Last Seen info and you also).
WhatsApp Last Seen Privacy Setting for Windows Phone, Nokia S40, Nokia S60, Nokia Asha
To change these settings, simply go to WhatsApp > Menu Button > Settings > Account > Privacy.
More Other help about whatsapp app comment below.
Available link for download
Thursday, March 2, 2017
How to Hide Tabs in internet explorer
How to Hide Tabs in internet explorer
How to Hide Tabs in internet explorer
1.Open a session of Internet Explorer.
2.Click on “Tools,” and select “Internet Options.”
3.Click on the “General” tab, then click on “Settings” under the Tabs section.
4.Remove the checkmark next to “Enable Tabbed Browsing.”
5.Click on “OK” twice when each option is presented.
6.Close all open sessions of Internet Explorer, then relaunch the browser. Your tabs will no longer display in future sessions of Internet Explorer
Available link for download
Subscribe to:
Posts (Atom)