Showing posts with label file. Show all posts
Showing posts with label file. Show all posts
Friday, June 2, 2017
Apne Blog Par Songs Softwere File Kaise Upload Kare
Apne Blog Par Songs Softwere File Kaise Upload Kare
Blogger Par Songs Softwere File Kaise Upload Kare
Dosto agar aap apne blog ko songs download karne wali website bnana Chahte hai to mai aaj aapko isi bare me batane wala hu mai bahut dino se blogging kar raha tha but iski Jankari nahi tha ki hum apne blog ya website par bhi softwere,games,video,mp3,document,file,koi bhi data aap upload kar sakte hai mere khyal se aap ye soch rahe honge ki blogger ko hum songs download karne wali website me convert nahi kar sakte hai to aap galat soch rahe dosto aap logo ko ye to maum hi hoga ki blogger google ki hi free platform hai aur aapne google drive ka naam to suna hi hoga online hame space dene wala to aap apne blog par bhi songs video upload karke apne blog ki traffic ya kuch bhi kar sakte hai dosto agar aap google drive ke bare me nahi jante to mai uske bare me bhi thoda bata deta hu
Google Drive Kya Hai Aur Is Par Kya Hota Hai
Google ke naam se hi lagta hai ki ye bhi google ki hi service hai aur isme drive ke naam se lagta hai ki hdd space matlab naam se hi saaf dikhae padta hai ki google drive online space hota hai jo ek dam free hota hai agar aap Chahte hai ki google drive ki madad se apne blog ko songs download karne wali website me convert karna Chahte hai to aap mere post ko dhyan se padhe google drive me aapko 15 gb online space milta hai jisme aap kuch bhi upload karke apne blog par use apne aunsa set kar sakte hai agar aap apne computer ya laptop me google drive download karna Chahte hai to https://drive.google.com/ Yaha se jaker kar sakte hai
Ab aap jab ise download karlenge tab aap ise install karke open kare uske bad aap apni gmail id se login ho jaye ab aapko 3 bar next ka option dega aap use karle phir aapko done par click karna hai jab aap ye setting complete kar lenge to aapke computer ya pc me ek google drive ka folder automatic hi ban jayega ab aap is google drive folder jo chij dalenge to wo aapke google drive ke cloud par automatic chala jata hai
Google Drive Par Kisi Bhi File Ko Kaise Upload Kare
Step 1: sabse pehle aap apne google drive me login ho jaye uske bad aapke samne google drive page open hoga
Step 2: ab aap new file ko click karke apna file upload par click kare

Step 3: Ab aap file document ya mp3 ko upload karna Chahte hai usko select kare aur upload par click karde

Step 4: jab aap file ya songs upload ho jayega tab aap usper right click kare phir aapko us link copy karna hai

Step 5: ab aapko is link ko apne blog me add karna padega agar aap kisi softwere ko upload kiye hai to aap apne blog me us softwere aur uske naam dekar aap add link me is link ko dalker link tital me download ka naam de sakte hai
Dosto ab aap ye jaan chuke honge ki hum apne blog par song video softwere kaise upload karte hai aapko maine puri Jankari di hua hai phir aapko kahi pe samajh nahi aaye to aap mujhse comment karke puch sakte hai
dosto mujhe ummid aapko ye Jankari atchi lagi hogi aap mere is post par ek atcha commet karke mera help kar sakte hai aur aap is site ke facebook page ko jarur like kare thanks
Available link for download
Saturday, May 27, 2017
How to Change the Icon for an Exe File
How to Change the Icon for an Exe File
How to Change the Icon for an Exe File
Few things make a good program more unappealing than a bad icon. You can have the most powerful program in the world, but a lousy icon will make it look dated and amateurish. If you’d like to change the icons of your favorite programs to something a little more “you,” read on after the break to learn how.
Using a Context menu Setup
1.Create a shortcut of the EXE file you desire. Right click the desktop and select "Create Shortcut".
2.Right click the shortcut with the default icon for the EXE file. Select Properties and click the "Change Icon" button.
3.Locate the image which is stored as a file. Make sure the icon is preferably 128 pixels long by 128 pixels wide.
4.Apply and save the changes. Click Apply, Hit OK.
Available link for download
Tuesday, May 23, 2017
How to Hide a Folder or File
How to Hide a Folder or File
How to Hide a Folder or File
Making a file or folder hidden is an easy way to add a small amount of security to your files, and can also be a good way to clean up some clutter in your file browser. Follow this guide to hide files in any operating system.
Method 1:- Windows
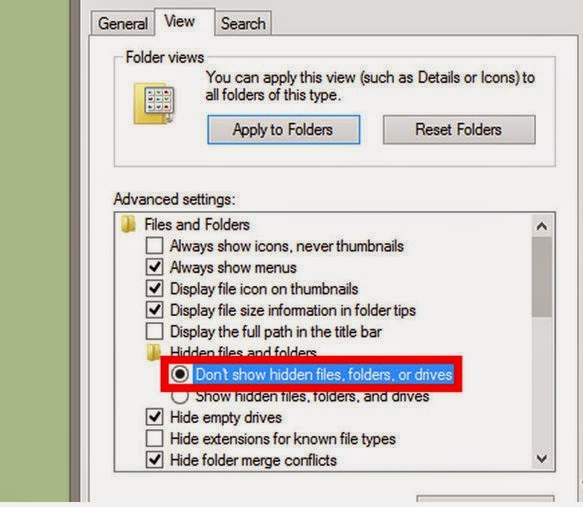
1.Set folder settings. To make sure that hidden files do not show up, hidden files need to be set to hidden in the Folder Options.
- In Windows XP, click Tools then Folder Options… in Windows Explorer. Click the View tab and under Advanced settings make sure that “Do not show hidden files and folders” is selected.
- In Windows Vista and Windows 7, click Organize in Windows Explorer, then Folder and Search Options. Click the View tab and under Advanced settings make sure that “Do not show hidden files and folders” is selected.
- In Windows 8, click the Options menu in the top-right corner of the window and select “Change folder and search options.” Click the View tab and under Advanced settings make sure that “Do not show hidden files, folders, and drives” is selected.

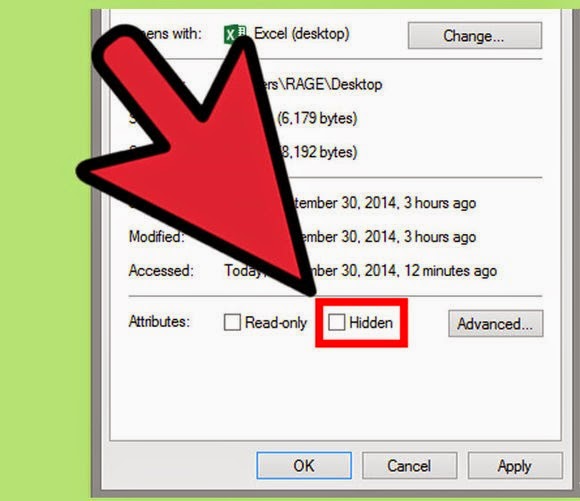
2.Navigate to the file or folder. Right-click on the file or folder and select Properties from the menu. In the General tab, check the Hidden box at the bottom. Click Apply and the OK.
3.Unhide the file or folder. Open Folder Options and select “Show hidden files and folders.” Navigate to your hidden file or folder. It will appear grayed-out to designate that it is hidden. Right-click it and uncheck the Hidden box in the Properties window.
Method 2:- Mac OS X
1.Open Terminal. Type “chflags hidden” then drag the file or folder that you want to hide into the terminal. The location of the file will be entered in after the command you typed. Press return to hide the file.
2.Unhide the file. To unhide the file, type “chflags unhidden <file name and location>” into the Terminal. You must specific the location of the file as well as its name and extension. If hidden files are set to be viewable, then you can drag the file as you did in the first step.
3.Show hidden files. To see hidden files in the Finder, open the terminal and type “defaults write com.apple.Finder AppleShowAllFiles TRUE.” This will make all files visible. To set hidden folders back to invisible, type “defaults write com.apple.Finder AppleShowAllFiles FALSE.”
- You can make a file or folder invisible in Mac or Linux by adding a “.” to the front of a filename. In the terminal type “mv sample.txt .sample.txt”. This will rename the file so that it cannot be seen.
Method 3:- MS-DOS
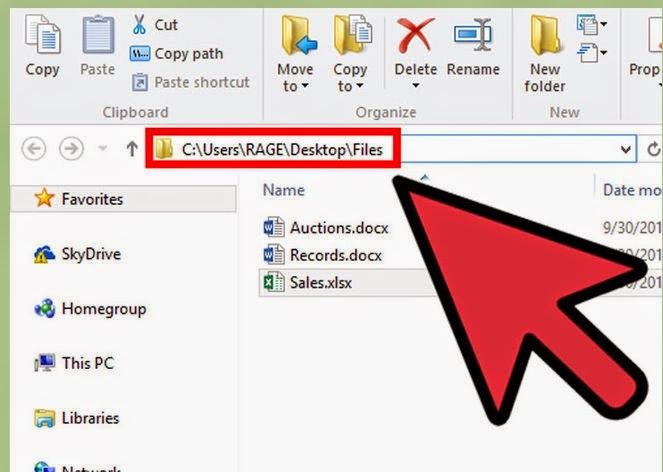
1.Locate the file or folder you want to hide. You will need to type the full path of the file when you hide it.
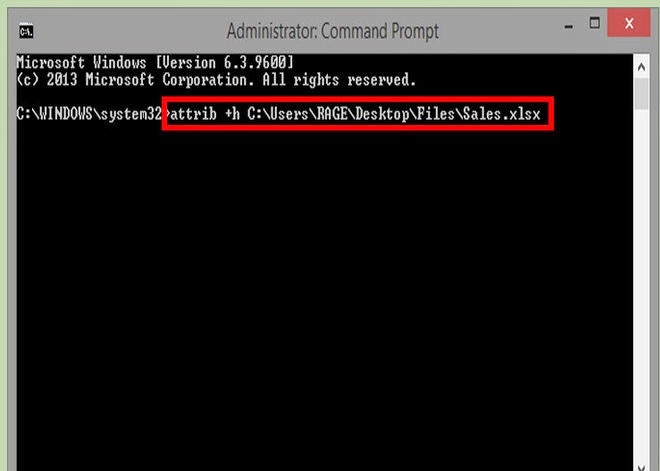
2.Change the attribute. Type “attrib +h c:examplesample.txt”. This will make the file hidden. To unhide the file, type “attrib –h c:examplesample.txt”.
Available link for download
Friday, May 19, 2017
Computer Ya Laptop Me Deleted File Ko Kaise Recover Kare
Computer Ya Laptop Me Deleted File Ko Kaise Recover Kare
Computer Ya Laptop Me Deleted File Ko Kaise Recover Kare (For PC)
Dosto Computer Ya Mobile aaj ka sabse bada aadat ban chuka hai waise me aapka sara data aapke computer me hi rehta hai jo ki bahut important file ya data hota hai jo anjane me galti se delete ho jata hai aur jyada tar log apna time bachane ke liye shift+del buttom ka use karte hai file ko delete karne ke liye isse aapka data recycle bin me nahi jata hai ye bahit badi galti hai to aaj ka mera post unke liye hai jo apne computer ya laptop me deleted file ko recover karna chahte hai
to mai un bhaieyo se kehna chata hu ki agar aapka important file ya data ko recover karna chahte hai to ye post padh ke apna data photos ya videos kuch bhi apne computer me paa sakte hai dubara
computer me deleted files bhi dobara recover kiya jaa sakta hai

Dosto ab mai aapko ye bhi bata deta hu ki files delete hone ke bad kaha par jati hai to mai aapse kehna chahta hu ki wo files hamesa ke liye delete nahi hota hai asal me wo computer ke hard drive me tab tak hota hai jab tak waha par koi file create naa ho to aapko tenson lene ki koi jarurat nahi hai mai aapko ek aise softwere ko aapke samne pesh kar raha hu jiski madad se aap koi bhi delete file ko dobara recover kar sakte hai aaeye jante hai kaise recover kare step by step
Read More:
Computer Me Windows Ka Backup Kaise Bnaye
Number use kiye bina whatsapp kaise chalaye
Playstore Par Kisi Bhi Softwere Apps Ko Free Me Kaise Download Kare
Step 1: Computer ya laptop me deleted files ko recover karne ke liye RecuvaSoftware Download Kare
Ye application sirf 4.4 mb ka hai aap download karle uske bad aap apne computer me install karke open kare
Step 2: jab aap isko open karenge tab aapko jo chij aapka delete hua wo select kare jaise aapka video hua hai to aap video select kare agar all file select karenge tab aapka jo jo delete hua hoga wo aapka recover hone lagega

Step 3: All files select karne ke bad aap Next ki buttom par click kare
Step 4: uske bad aapko I m Not Sure Select Karke Next Ki Buttom Par Click Kare
Step 5: Phir aapse ye Deep Scanning karne ko bolega aap usko on karke Start Ki Buttom Par Click Karde
uske bad aapka sara file ya data list me aajayega aap sabko select karke Recover Kar sakte hai
ummid karta hu dosto ye trick aapko jarur pasand aaya hoga aur agar aapko kahi par problem aaraha hai to aap hame comment ke madhyam se puch sakte hai
Read More:
COMPUTER KI SPEED FAST KAISE KARE 5 TARIKE SE
COMPUTER KA PASSWORD KAISE UNLOCK KARE
PENDRIVE KO BOOTABLE KAISE BANAYE
FACEBOOK PHOTO PAR AUTO LIKE COMMENT KAISE KARE
Dosto agar ye post pasand aaya hai to mere site ke facebook page ko jarur like kare aur post apne dosto ke pass share karna naa bhule aur jaha samajh nahi aaye aap comment me puch sakte hai
Available link for download
Thursday, May 18, 2017
Remove e Aadhaar Card PDF File Password
Remove e Aadhaar Card PDF File Password
People are asking this question the most “how to remove e-Aadhaar Card PDF document file password”, when every time they open their e-Aadhaar Card PDF File document it asks the password in the password prompt. So we will help you in this topic on how you can remove the password from the e-Aadhaar Card PDF password protected file.

Here is an important article which you can go through to remove your Aadhaar Card PDF file password to know click here.
Also Read: Aadhaar Card Online Correction Status
Here is an important article which you can go through to remove your Aadhaar Card PDF file password to know click here.
Also Read: Aadhaar Card Online Correction Status
Available link for download
Tuesday, May 2, 2017
How to Play a SWF File in Ubuntu Using Gnash
How to Play a SWF File in Ubuntu Using Gnash
How to Play a SWF File in Ubuntu Using Gnash
Well Ubuntu sure has many options open for running SWF files but none of them do really work but the one way I am going to write will surely work. Else heres my address. You are welcome to kill me if I am wrong!!!
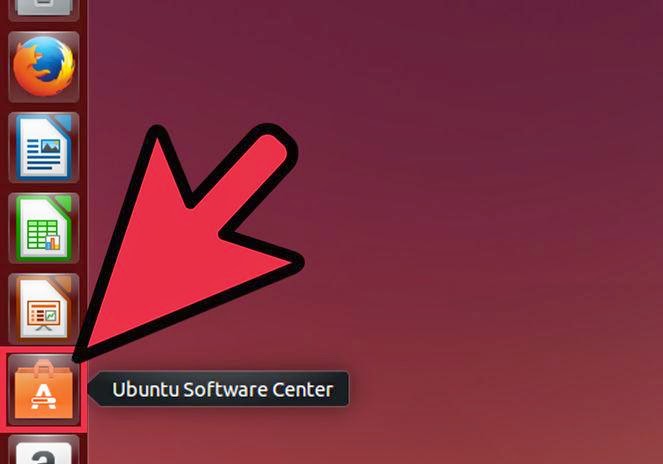
1.Click on the Ubuntu Software Center icon on the launcher.
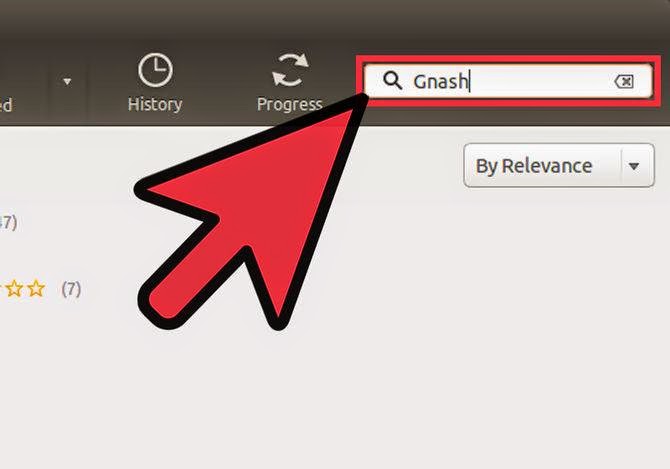
2.Search for Gnash in the search bar on the top right hand side.

3.Download both the applications ticked in the image.
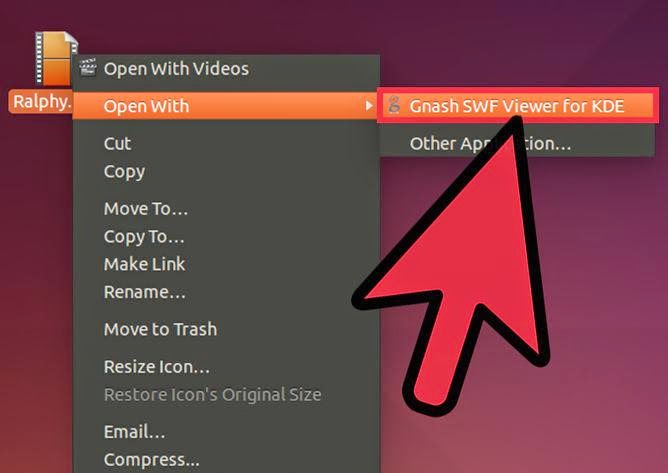
4.now you can open any file with a .swf extension by clicking the right mouse button and selecting Open With->Gnash
- Not all .swf files run on Gnash and it crashes frequently.
Available link for download
Thursday, April 13, 2017
How to Make a Zip File
How to Make a Zip File
How to Make a Zip File
Need to send a bunch of files to someone though email? Want to save some space on your computer by consolidating all of your old pictures? Need to keep prying eyes away from important documents? Creating ZIP files will help you save space, organize your excess files, and encrypt sensitive material. Follow this guide to create ZIP files on both Windows and Mac OS X.
Method1 :- Creating a ZIP File in Windows
1.Create a folder. The quickest way to create a zip file is to place all of the files that you want to archive into one folder. You can place multiple files and folders into the folder that you are creating the ZIP file from.
- Rename the folder to whatever you want the ZIP file to be named.
2.Right-click on the folder. Hover your cursor over the “Send to” option. This will open a new submenu. Select “Compressed (zipped) folder”.
- You can also select multiple files in your file explorer, right-click on one of them, and then follow the above steps. The resulting ZIP file will contain all of the selected files and will be named after the file that you right-clicked on.
3.Wait for the folder to be created. If you are adding a lot of files to the new ZIP file, it may take a few moments to create it. A progress bar will appear as files are added. Once the process is complete, the ZIP file will appear in the same location as the original folder
Method2 :- Creating a ZIP File in Mac OS X

1.Create a folder. The quickest way to create a zip file is to place all of the files that you want to archive into one folder. You can place multiple files and folders into the folder that you are creating the ZIP file from.
- Rename the folder to whatever you want the ZIP file to be named.
2.Right-click on the folder. Click the “Compress” option. The folder will be compressed into a ZIP file. The new ZIP file will be located in the same location as the folder that you compressed.
- You can also select multiple files in your file explorer, right-click on one of them, and then follow the above steps. The resulting ZIP file will contain all of the selected files and will be named “Archive.zip”.
Method3 :- Creating a Password-Protected ZIP File
1.Download a compression program. Newer versions of Windows cannot create password-protected ZIP files without installing additional software. Compression software is available both for free and for purchase, though you don’t need anything fancy to create a protected ZIP. The most popular programs include:
- 7-Zip
- IZArc
- PeaZip
2.Create a new archive. Use your compression software to create a new ZIP file. Add the files that you want to compress. When you create the ZIP file, you will be given the option to enter a password. You will need to use this password to access this ZIP file in the future.
3.Create a password-protected ZIP file in OS X. To create a password-protected Zip file in OS X, you can use the Terminal and you don’t need to download any other programs. First, place all of the files that you want to compress into a single folder, and then rename that folder to the name that you want your ZIP file to have.
- Open the Terminal. This can be found in the Utilities folder in your Applications folder.
- Navigate to where the folder that you want to compress is located.
- Enter the command:
zip –er <foldername>.zip <foldername>/* - Create a password. You will be asked to enter your password twice to verify it. Once you have entered the password, the ZIP file will be created.
Available link for download
Wednesday, March 29, 2017
How to Remove Restriction from PDF File
How to Remove Restriction from PDF File
How to Remove Restriction from PDF File
Now user can easily unlock bundles of Secured PDF file with ease by using PDF Security Remover.
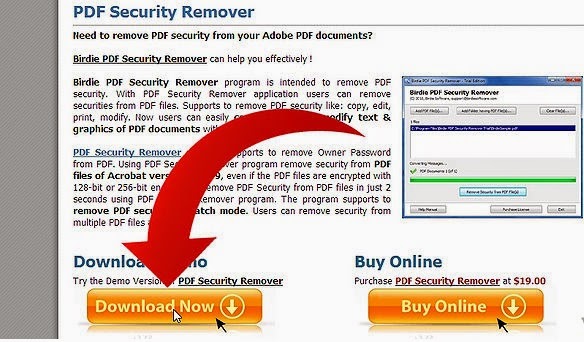
1.Download PDF Security Remover Tool and Install it -http://www.birdiesoftware.com/pdf-security-remover/

2.Run software on PC – Start>>Programs>>PDF Security Remover>>PDF Security Remover

3.In screenshot of software, you will found “Add Folder having PDF File(s)”.Then browse folder having restricted PDF files on your PC.
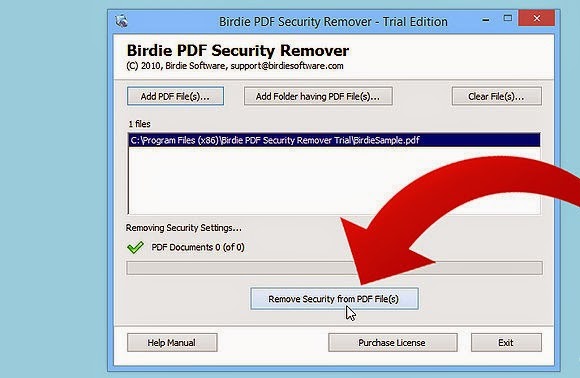
4.Hit the button “Remove Security from PDF file(s)” and select the saving location to save unlocked PDF file.
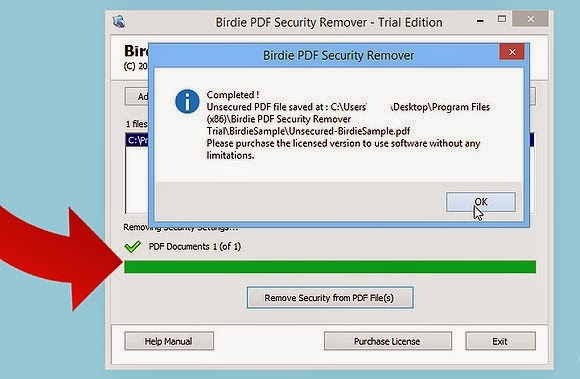
5.Once your conversion will start, you will receive a message on screen when process complete.
6.Now you can view your PDF files without any restriction.
Available link for download
Wednesday, March 22, 2017
How to Remove E Aadhaar Pdf File Password
How to Remove E Aadhaar Pdf File Password
When you open E Aadhaar Pdf file it asks the password in password prompt every time. If you want to open E Aadhaar pdf file without password , you need to remove password from E Aadhaar pdf file . You can easily remove E Aadhaar pdf Password Online .
There are two ways to remove pdf password.

Register Your mobile in Aadhaar Online via Free Android App Aadhaar Updater
There are two ways to remove pdf password.
Online from Website.
- First open the website http://www.pdfunlock.com/
- Upload pdf file from Computer or Dropbox or Google Drive.
- Click on Unlock Button
- Enter Your pdf Password (Only once)

- After entering pdf Password Click Unlock
- Now your Unlocked E Aadhaar pdf file will be download into your Computer.
- Save it and Open it without Password.
Pdf Unlocker Software.
- You Can Unlock your pdf file password via Pdf Unlocker (software)
- To download Pdf Unlocker Software form website http://pdf-password-remover.en.softonic.com/
- Download the Software and enjoy unlocking pdf files.
Register Your mobile in Aadhaar Online via Free Android App Aadhaar Updater 
Available link for download
Sunday, March 19, 2017
E Aadhaar Card Pdf File Open Passward
E Aadhaar Card Pdf File Open Passward
How to open E Aadhaar Card pdf file ? E ???? ????? PFD ???? ?? ???? ??? ???? ?
 Available
Subscribe to:
Posts (Atom)