Showing posts with label using. Show all posts
Showing posts with label using. Show all posts
Wednesday, June 14, 2017
How to Connect to an OS X Mavericks Server Using the Server App
How to Connect to an OS X Mavericks Server Using the Server App
How to Connect to an OS X Mavericks Server Using the Server App

1.Open the Server App.

2.Click on the Other button.

3.Enter Server Information.
- Enter the server address. This can be either a local IP address or a registered domain name.
- If you need to access it internally either methods can be used, but if you need to access the server externally the suggested method is to use the registered domain name that you have set up.
- Examples: 192.168.X.X or server.example.com
- Enter user information. "NOTE: This must be a user that is allowed to administer the server"
- Click Connect when finished
4.Congratulations! If the information you entered is correct, you will be connected to the server and be able to edit all the features available in the Server App.
Available link for download
Monday, June 5, 2017
How to Convert BIN Files Using Power ISO
How to Convert BIN Files Using Power ISO
How to Convert BIN Files Using Power ISO
When you rip or copy an entire CD or DVD, your computer system creates a copy of all the details of that CD into one compressed file known as BIN. BIN files are binary file type formats that contain information about an optical disk such as its attributes (audio name, album, genre, etc.), album artwork, disk settings, and more. Most programs don’t have the capacity to open BIN files, but if you want to access the information embedded within these kinds of files, all you need to do is to convert them into ISO format.
Part 1 : Getting Power ISO

1.Download Power ISO. One common application used to convert BIN files is Power ISO. It’s a program that turns BIN files into ISO file formats, a much more readable file version. You can download Power ISO for free here:http://www.poweriso.com/download.htm.

2.Click the downloaded file to open it. Your computer’s installation wizard should run and install Power ISO on your computer.

3.Launch Power ISO. After the installation process is finished, click the shortcut icon from your desktop to open the application.
Part 2 : Converting BIN Files to ISO

1.Open the Convert menu. Click “Tools” from the menu bar on the upper-left corner of the Power ISO window and select “Convert” from the drop-down list to open the Convert menu.

2.Click the three-dot button on the right side of the “Source File” text field. This will open an Explorer window.

3.Open the BIN file. Using the Explorer window, navigate to the location on your computer where the BIN file is, select the BIN file, and click “OK” to open it on Power ISO.

4.Set the destination file. Back on the Convert Menu window, set the destination file to “ISO” by clicking the appropriate radio button.

5.Type a file name you want for your ISO file. Type in the name you want for the output ISO file on the text field provided at the lower part of the Convert Menu window.

6.Convert the BIN to ISO. Click the “OK” button to start converting the BIN file into ISO
Available link for download
Saturday, June 3, 2017
Shop worth Rs 1000 or more using Amazon Gift Card Balance and get Rs 100 back as an Amazon Gift Card
Shop worth Rs 1000 or more using Amazon Gift Card Balance and get Rs 100 back as an Amazon Gift Card
Offer Dates : (1st October - 5th October Both days Inclusive)

- The offer is applicable on purchase of any product(s) on Amazon.in (excluding Apps, Amazon Gift Cards).
- The customer will receive the cashback Gift Card 30 days after the promotion ends.
- The purchase needs to be made entirely with Amazon Gift Card Balance, it cannot be combined with any other payment method.
- The offer is limited to only one purchase per customer during the offer period.
- The overall Cart Value should be more than Rs. 1000 to be applicable for the offer
- The offer is not applicable on payment mode for Prime Membership subscription or renewal.
Add balance Now
Available link for download
Saturday, May 20, 2017
How to Create a Video Album Using the Most Basic Tools
How to Create a Video Album Using the Most Basic Tools
How to Create a Video Album Using the Most Basic Tools
If youre a wannabe artist and love to pretend [and try to get in] that your in the media, heres a fun way to know how to make visually stunning albums and sell them, just like Beyoncé!
1.Get some software for your videos. Your going to need something like a camera, and obviously a computer program to edit the footage. Get something like Windows Live Movie Maker, which you can download for free, and just record yourself on a webcam.
2.Find a music source. If you have a cellphone with a recorder, you can record yourself singing the song (or part of it) and place it in the cameras microphone as you lip-sync to it. Try turning on your camera first and then quickly push the play button for your audio clip.
3.Try getting a nice background. Your not going to have an awesome music video if your set looks like a school kids bedroom. You need to design the area your camera views. Try doing something like a blank area, or a symbolic background.
4.Once you have all your footage, put in some effects. If you use something likeWindows Live Movie Maker, youre going to have a limit of effects. But make it work into the setting! You cant just put a random effect. Put something in there that makes sense.
5.Add some transitions! Nobody wants to see you turning on the camera, so put in a transition that will go straight to you singing. If youd like, you could put a transition that sends a subliminal message about the song. But if not, just make something that matches the scene.
6.Add an opening cover. People need to know the name of you and your songs, so add an opening title that lasts 4 - 7 seconds. You could also try introducing your video with some cover art. just in case youre really into the fake media thing.
7.Put up the video clips together so the computer sees it as one video. Make sure your video is received as one whole thing, or else, itll just be a file. Not a video. Put the clips all up together by saving it onto a file explorer.
8.Publish it! Once you have all your music videos together, go to something likeWindows DVD Maker and stylize your video album. Make a video wall or a screenshot. As soon as thats done, burn the DVD and you can sell it to your friends.
Available link for download
Thursday, May 18, 2017
How to Convert HTML to PDF Online Using Pdfy
How to Convert HTML to PDF Online Using Pdfy
How to Convert HTML to PDF Online Using Pdfy
This an easy way to convert your HTML code to PDF online without wasting time. Onwww.pdfy.net your PDF file starts downloading immediately.
1.Navigate to PDFy


2.Click on "HTML to PDF" tab.
3.Paste your HTML code or type in your code.
4.Click on "Convert to PDF" button and you are done!! Your PDF file should start downloading.
Available link for download
Wednesday, May 10, 2017
Check Adhaar card Status Using Toll Free and SMS
Check Adhaar card Status Using Toll Free and SMS
?Check Adhaar card Status Using Phone(Toll Free Number)
Simply Dial 1800-300-1947 and Get Your Adhaar Status Easily Even without Internet. Using this Aadhar Toll Free Number, You can Check Your Aadhar Card Status Anytime without any charge.?Track Aadhar Status using SMS
There will be a normal sms charge to send sms. You will get Your Aadhar status Only if You Send message to uidai using your registered mobile number. You have to send message from the number you have registered at the time of adhaar enrollment. Let Me show How!Send SMS Like this: UID STATUS <14-digit Enrollment Number>
Note: All letters Should be Capital
Now, Send this sms to 51969.
You will Recieve a message in less than a Minute.
You will get a message like this: Congratulations, Your adhaar Has been Generated by UIDAI and will be delievered soon.
Sometimes, You will get message like this: “Your aadhar is in Process”, You should wait for sometime. usually, the Adhaar got generated under 90 days of enrollment.
Available link for download
Tuesday, May 9, 2017
Download Youtube videos Using UC Browser In Smart Phone
Download Youtube videos Using UC Browser In Smart Phone
Download YouTube videos Using UC Browser In Smart Phone
Huge Number of Internet users available in all the world and lots of internet users use Android smart phone, Apple i-phone, windows smart phone, black barry smart phone for browsing and surfing on internet and lots of smart phone users play online videos like youtube videos, Vimeo, Dailymotion and all other online videos available on internet. Smart phone users want to download & save all the favorite online videos in android, Apple i-phone, windows, black barry smart phone. So the question is that how to download and save online videos in my smart phone by using UC Browser. This trick is very simple to download online videos and youtube videos in mobile and smart phones. Its very simple to use by follow all the steps given below to download and save youtube online videos and all other online videos nad movies.

How To Download Youtube Online Videos In Smart Phone Using UC Browser Step By Step with image.
Download youtube video by Using ClipGrab software In Computer1st Step - First of all Download UC Browser.
All smart phone users (android, Apple i-phone, windows, black barry) first download us browser in your smart phone. Android user first open google play or android market. Now search UC Browser and download it. Other smart phone users like android, Apple i-phone, windows, black barry, they all first open mobile internet browser and type in google search engine "download latest uc browser" after that open the first link and click to download option. Direct link to download uc browser for all users.

2nd Step - Download UC Browser Videos Downloader Add On.
After that Download uc browser video downloader add on in your smart phone. To download uc browser video downloader add ons first open internet browser or uc browser and type in google home page "video downloader uc add ons" and click on the this type on link "addon.ucweb.com" and download and install this app. Direct link to download uc browser video downloader for all users.

3rd Step - Select Videos To Download And Save.
After that select video and click to play. Open your uc browser and click on the youtube icon and search your favorite youtube videos and other online videos and click to play. In few second you see the video download icon in the bottom on video and click on it to download it.

In short how to download youtube videos in uc browser.
1. download uc browser in your smart phone and install it.2. download uc browser video downloader add ons and install it.
3. select your online video and click to play online.
4. after that click on the download icon to save your online videos.
Available link for download
Tuesday, May 2, 2017
How to Play a SWF File in Ubuntu Using Gnash
How to Play a SWF File in Ubuntu Using Gnash
How to Play a SWF File in Ubuntu Using Gnash
Well Ubuntu sure has many options open for running SWF files but none of them do really work but the one way I am going to write will surely work. Else heres my address. You are welcome to kill me if I am wrong!!!
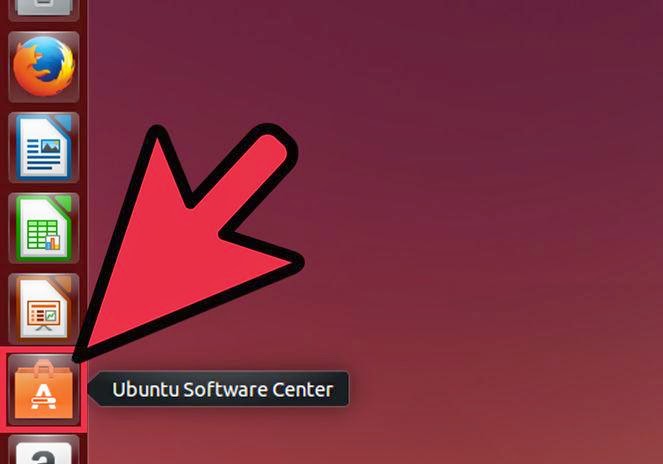
1.Click on the Ubuntu Software Center icon on the launcher.
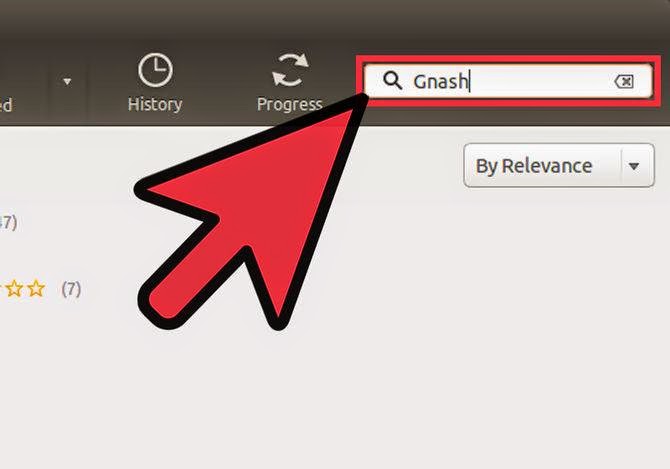
2.Search for Gnash in the search bar on the top right hand side.

3.Download both the applications ticked in the image.
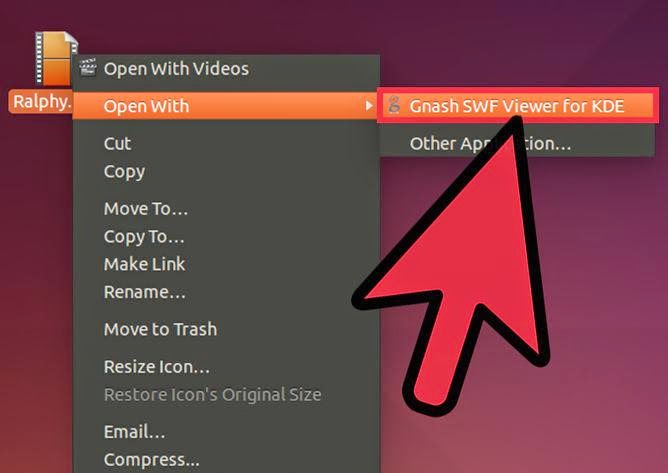
4.now you can open any file with a .swf extension by clicking the right mouse button and selecting Open With->Gnash
- Not all .swf files run on Gnash and it crashes frequently.
Available link for download
Sunday, April 16, 2017
How to Subnet Using VLSM
How to Subnet Using VLSM
How to Subnet Using VLSM
One method for subnetting is done using the method known as VLSM or Variable Length Subnet Mask. This is an alternative to CLSM (constant length subnet mask), in that using VLSM you subnet a network by applying a different subnet mask for the various subnet that you create. This method is preferred when the various subnets have substantial differences in the number of hosts that they need per subnet. In situations some subnets may only need a few addresses while others require a lot more.
Using VLSM can accomplish this by wasting as few address as possible.
- Suppose you are given the address block of 192.168.10.0/24 and you need the following requirements:
- subnet A ~ 66 hosts
- subnet B ~ 10 hosts
- subnet C ~ 22 hosts
- subnet D ~ 2 hosts
1.List all of your possible subnets.
- /24 = 254 hosts
- /25 = 126 hosts
- /26 = 64 hosts
- /27 = 32 hosts
- /28 = 16 hosts
- /29 = 6 hosts
- /30 = 2 hosts
2.Arrange your requirements in descending order.
- Subnet A - 66
- Subnet C - 22
- Subnet B - 10
- Subnet D - 2
3.Assign the appropriate subnet masks to each subnet.
- Allocate the First highest subnet
- Assign 192.168.10.20 mask /25 for subnet A to satisfy there need for 66 hosts. The last octet of the subnet mask will be 1000000 (255.255.255.128)
- Assign the next highest subnet
- Assign 192.168.10.128 the mask /27 for subnet C; the last octet of the subnet mask will be 11100000 (255.255.255.224)
- Assign the next highest subnet
- Assign 192.168.10.160 the mask /28 for subnet B; the last octet of the subnet mask will be 11110000 (255.255.255.240)
- Assign the last subnet
- Assign 192.168.10.176 the mask /30 for subnet D; the last octet of the subnet mask will be 11111100 (255.255.255.252).
4.Review the Subnetting summary.
- Subnet A = 192.168.10.0/25 ~126 hosts (needed 66)
- Subnet C = 192.168.10.128/27 ~ 30 hosts (needed 22)
- Subnet B = 192.168.10.160/28 ~ 14 hosts (needed 10)
- Subnet D = 192.168.10.176/30 ~ 2 hosts (needed 2)
Available link for download
Monday, April 10, 2017
How to Connect an A2DP Bluetooth Headset to PC Using a Bluetooth Adapter
How to Connect an A2DP Bluetooth Headset to PC Using a Bluetooth Adapter
How to Connect an A2DP Bluetooth Headset to PC Using a Bluetooth Adapter
This is going to be a tutorial for those wanting to connect their stereo bluetooth headset to their PC. This is based on windows 7 and a Nokia BH-604 headset, although the steps are all very similar. This is done using a Rocketfish USB Bluetooth dongle.

1.Install the Bluetooth adapter if you have not already done so. Make sure to give it enough time to install the necessary drivers.

2.Turn the Adapter on if you have not already done so. Navigate your way to devices and printers and locate your bluetooth adapter. Right click and select properties. Make sure to: Allow Devices to Find this computer, Allow devices to connect to this computer, Alert me when Bluetooth device wants to connect, and If you wish, Show bluetooth in the notifications area.

3.Set your headset into discovery mode and search for it using your PC. This is done by clicking the devices tab under your adapters properties window or right clicking the bluetooth icon in the system try and clicking add device.

4.When your adapter has found your device it is time to pair it. Some headsets come with a pairing code of 0000. Check your manual for your code.

5.Once paired allow the computer to install the drivers from windows update.

6.Set the headset for stereo audio. Open up Bluetooth devices by right clicking the system tray icon. Right click your headset and select properties. Navigate over to the services tab and allow it to load the services. We need to make sure "Audio Sink" and "Headset" are both checked. You may also un-check "Hands-free Telephony". I found my headset switched to mono sound when using Skype calling. Disable it to avoid This from happening. Click Apply/OK and allow the computer to install more drivers (This may not be necessary if audio sink and headset were both checked)

7.Select the headset. Make sure your headset is still on and connected. Open up the "control panel" and select "hardware and sound" and then "Sound". Under the playback tab you will see a new bluetooth audio. It may be called Stereo Audio or not depending on your headset. You need to right click the device and set it as default. Make sure no sound is being played when setting the headset. This may make the headset not respond properly. If this does happen restart your headset.

8.Test! Try playing some music or a video in windows media player. If you hear sound then you are all set up.
Available link for download
Monday, April 3, 2017
How to Install Windows 7 Windows 8 Windows 8 1 Using Pen Drive
How to Install Windows 7 Windows 8 Windows 8 1 Using Pen Drive
How to Install Windows 7,Windows 8 & Windows 8.1 Using Pen Drive?
??????Follow This 7 Step??????
1.Start PowerISO
2.Insert the USB drive you intend to boot from.
3.Choose the menu "Tools > Create Bootable USB Drive". The "Create Bootable USB Drive" dialog will popup. If you are using Windows Vista or Windows 7 / 8 operating system, you need confirm the UAC dialog to continue.
4.In "Create Bootable USB Drive" dialog, click "..." button to open the iso file of Windows 7 or Windows 8.
5.Select the correct USB drive from the "Destination USB Drive" list if multiple USB drives are connected to the computer.
6.Choose the proper writing method. "USB-HDD" is recommended.
7.Click "Start" button to start creating windows 7 / 8/ 8.1 bootable USB drive.
Available link for download
Saturday, March 25, 2017
How to Check Account Balances using an ATM
How to Check Account Balances using an ATM
Do you want to know your bank account balances ? Then dont need to go to your bank, only you have to go to your nearby ATM. In this post I show you how to check account balances using an ATM.
Step 1.
Go to your nearby ATM and insert your card to the ATM machine.

Step 2.
Now Select your language from menu.

Step 3.
Now enter your ATM or Debit cards PIN number.

Step 4.
Now from the main menu Select Balance Enquiry option.

Step 5.
ATM screen will show various types of accounts. Select your account type that may be saving or current.

Step 6.
Now a new screen appear here you can see your account balance.

-------------------------------------------
Read also
?How to Withdraw Money from ATM Machine 7steps
?How to Change ATM or Debit cards PIN number 7 steps
?How to Use Banks ATM to Deposit Money in ATM Machine with an Envelope
?How To Deposit Money In A Cash Deposit Machine
?How to use Debit Card for Online Payment 5 Steps
?How to Withdraw Money from ATM Machine 7steps
?How to Change ATM or Debit cards PIN number 7 steps
?How to Use Banks ATM to Deposit Money in ATM Machine with an Envelope
?How To Deposit Money In A Cash Deposit Machine
?How to use Debit Card for Online Payment 5 Steps
Available link for download
Thursday, March 16, 2017
How to Shut Down a Computer Using Notepad
How to Shut Down a Computer Using Notepad
How to Shut Down a Computer Using Notepad
Notepad, Windows free text editor, is also a competent code editing program. You can use some simple Windows commands in Notepad to create a file that will shut down your computer when you run it. This is great if you want to save some clicks for future shut downs, or you want to play a prank on a friend.
1.Open Notepad. This is the free text editing program that comes with every version of Windows. You can use it to create a command that, when run, will shut down Windows for you.
- You can find Notepad by clicking the Start menu and selecting "Programs" ? "Accessories" ? "Notepad". You can also click the Start menu, typenotepad, and press ? Enter.
2.Type .shutdown.exe -s on the first line. This is the command to shut down the computer.
3.Add a timer by using the .-t flag. By default, the shutdown process will be delayed by 30 seconds. You can change this by using the -t gflag with the number of seconds you want to delay.
- For example, to create a shutdown command that waits 45 seconds, typeshutdown.exe -s -t 45.
- To create a shutdown command that shuts the computer down immediately, typeshutdown.exe -s -t 00.
4.Add a message to be displayed. If you want, you can add a personalized message to the shut down notice by using the -c flag. Using the above example, typeshutdown.exe -s -t 45 -c "comment". The comment must be in quotes.[1]
- For example, you can let the user know how long until the shutdown begins by typing shutdown.exe -s -t 45 -c "Computer will shut down in 45 seconds".
5.Click "File" and select "Save As". You will need to save the file as a batch file, which Windows can execute to run the shutdown command.
6.Click the "Save as type" drop-down menu and select "All Files (*.*)". This will allow you to change the file type.
7.Delete the ..txt from the end of the file name. Replace it with .bat.
- If you dont see the three letter file extensions, click here.
8.Save the file. A new copy will be created with the .bat extension, and it will have a different icon than a standard text file.
9.Run the newly-created file to run your shutdown process. The shutdown will occur according to the rules you created.
- Make sure youve saved anything you need to before running the shut down program.
Available link for download
Subscribe to:
Posts (Atom)