Showing posts with label account. Show all posts

Thursday, June 29, 2017

How to check whether Aadhaar Number is linked to Bank Account

How to check whether Aadhaar Number is linked to Bank Account


Now Aadhaar Portal offers freedom to its residents to check whether their Aadhaar Number is linked to Bank Account. This feature have proved very important to residents as they are easily able to check if Aadhaar is linked to bank account by using Check your Aadhaar Linking Status with Bank from Online Aadhaar Portal without visiting bank to confirm if their Aadhaar Number have been successfully linked to their bank account or not.

So below is the procedure on How to check whether Aadhaar Number is linked to Bank Account.

How to check whether Aadhaar Number is linked to Bank Account Online [Check Aadhaar Linking Status with Bank]


  • Just visit Check Aadhaar Linking Status with Bank page by clicking here.
Check Aadhaar Linking Status
  • Once you are on the page Check Aadhaar Linking Status with Bank, enter UID Number or Aadhaar Number below you will find security code in the image just reenter it in the textbox provided and click on Verify button.
Check Aadhaar Linking Status with Bank
  • On clicking verify button if your Aadhaar Number is linked with bank it will show your Aadhaar Number is linked with Bank and if it is not linked with any bank it will show “Your aadhaar is not linked to a bank”.
Note: Aadhaar Linking status is fetched from NPCI Server. Under any circumstance, UIDAI shall not be responsible or liable for the correctness of the displayed status. Further, UIDAI is not storing any information fetched from NPCI server.

How to check whether Aadhaar Number is linked to Bank Account through Mobile [Check Aadhaar Linking Status with Bank]


Alternatively without internet you can also check whether Aadhaar Number is linked to Bank Account through Mobile free of cost. So what is the procedure to check if Aadhaar Number is linked to Bank Account through Mobile by dialing USSD code you will know it by following below procedure.
  • From your mobile just dial *99*99*#.
heck whether Aadhaar Number is linked to Bank Account through Mobile
  • It will ask you to “Please enter your 12 digit Aadhaar Number” Enter your Aadhaar Number and tap on Send Button.
Please enter your 12 digit Aadhaar Number
    • Again in next screen it will ask you to confirm your Aadhaar Number so to confirm you will have to enter 1 and tap on send button.
    Confirm your Aadhaar Number
        Aadhaar Number Linking with Bank Status
        • In next screen you will get to know whether your Aadhaar Number is linked to bank account or not, if your Aadhaar Number is linked with bank account it will show you that Aadhaar Number is linked with Bank Account and if your Aadhaar Number is not linked with any bank it will show “Sorry, the Aadhaar Number you have entered is not linked with any bank”.

        Also Read: Linking Aadhaar Card with SBI Bank Account Online


        Available link for download

        Read more »

        Monday, June 12, 2017

        How to Delete an Account on Windows

        How to Delete an Account on Windows


        How to Delete an Account on Windows

        Deleting accounts

        1.Go to your Start menu.

        2.Go to you Control Panel.

        3.Select User Accounts And Family Safety.

        4.Click on "Add Or Remove User Accounts."

        5.Click on the account you want to remove.

        6.Press "Delete This Account."

        Available link for download

        Read more »

        Saturday, June 10, 2017

        youtube account id kaise banaye

        youtube account id kaise banaye


        youtube account id kaise banaye ?

        hello dosto aaj ke hum is post me hum ye janenge ki youtube account id kaise banaye hindi me janeye aaj me aapko youtube par account banana step by step puri jankari dunga sabse pehle hum ye jan le ki youtube kya hai


        YOUTUBE PAR ACCOUNT KAISE BNAYE.jpg

        youtube kya  hai aur ye kaise kam karta hai ?

        youtube ek online video share karne wala site hai ye 2005 me banae gaye thi kuch dino bad google ne isko kharid kar apne me mila liya liya matlab ye google ki taraf se hai aur duniye me jyadatar log video banakar youtube se paisa kama rahe hai hai aur koi bhi kama sakta haI youtube par paise kamane ke liye aapko kuch bato ka dhyan rakhna bahut jaruri hai

        youtube par kaise kya kare ?

        sabse pehle to aapko apne youtube channel ke liye ek video banana bahut jaruri hai
        aap apne camera ya mobile se ek video banale dhyan re aapka video hd kwaliti me me hona chahiye nahi to aapka jo video hai wo sahi se nahi chalega to viewer ko parsani hogi aur wo aapka chennal ko subscribe ya like nahi karega

        youtube par video ko kaisa hona chahiye ?

        aapka jo you tube chennal hai waha par agar aap kisi dusre ka video ko upload kar dete hai to aapka chennal par viewer nahi aayenge isliye aapko kisi dusre video ko nahi upload kar sakte aapko apne video banaker youtube par upload kar sakte hai chahe aapka video
        comedy,tips,tricks, ya kaisa bhi ho magar aapka banaya hua hona chahiye
        aur aapko video me jaruri nahi hai ki aap apne video ko editing karke naya look deke tab upload kare isse koi dikkat nahi hai kaise bhi bana sakte ho

        apne youtube account me login kaise kare ?

        mai aapko ye bataya hi tha ki youtube google kihi service hai aapko youtube account banana ki koi jarurat nahi hai aap apne gmail account se login kar sakte hai

        youtube par apne video ko kaise upload karte hai ?

        youtube par jub aap login kar lenge to aap video ko upload karna hai
        aap youtube par mobile se bhi video ko upload kar sakte hai

        youtube par hum kitni video ko upload kar sakte hai ?

        youtube par hum jitni chahe utni video ko upload kar sakte hai aap jitna chahe utna koi limit nahi hai
        ab aapko apne video ko monetize karna hai

        youtube par video ko monetize kaise karte hai ?

        ab aap ye jarur soch rahe honge ki ye monetize kya hota hai aur ise monetize kaise karte hai
        monetize karke hum apne video par ads laga sakte hai jub viewer hamare video ko dekhte hai tab 4 se 5 second ya 30 second tak ek ad apne video par dikhta hai tab hamara earning hota hai matlab kamae hota hai aur ye hum apne aur iske liye hame pehle adssense account banana hoga aur apne youtube channel se connect karna hoga

        adsense account banane ke liye yaha click kare

        youtube se income kitni hoti hai ?

        youtube se hamari income jyada tab hoti hai jub jub koi hamare ads ke video par click karta hai tab agar nahi karta hai phir bhi 1000 views par 1dollar milta hai matlab 65 rupya

        payment kaise milti hai
        payment hame hamare 100 dollar ho jane ke bad hi milti aap apne adsense me jaker aap apna balance sidhe apne bank me transfer kar sakte hai 100 dollar ho jane ke bad 6000
        rupya apne bank account me direct transfer kar sakte hai

        youtube se earning karne ke liye aapke pass kya hona chahiye ?

        1 - adsense par account
        2- bank account
        ab aapke liye dosto agar ye post aapko pasand aaya to aap hamare post ko apne googleplus, ya facebook,twitter par share karke hame like jarur kar le aur agar aap aisa hi aur bhi tricks ki jankari apne imel par pana chahte hai to aap hame subscribe jarur kare

        Available link for download

        Read more »

        Thursday, June 1, 2017

        How to Create an Apple ID Account and Download Apps from Apple App Store

        How to Create an Apple ID Account and Download Apps from Apple App Store


        How to Create an Apple ID Account and Download Apps from Apple App Store


        There is no doubt that besides the features of the phone itself; apps are the things that make a smartphone even smarter. Apple also occupies the top place for apps manufacture. The app developer community of Apple has created over 775,000 apps for various products from Apple such as iPhone, iPad, iPod throughout the world and has spent billions dollars for them. Apple App Store is the place where you can get all those apps. Some of the apps can be downloaded for free while others are available in nominal price. Apple just recently announced that over 40 billion apps have been downloaded from app store since its launch in 2008. Apple claims that nearly 20 billion apps were downloaded in 2012 alone. It also claims that there are over 500 million active user of App Store. If you use any of the Apple products and want to download some apps from Apple App Story, you need have an Apple ID account. The same Apple ID account can be used to download apps from iTunes Store, App Store, iBookstore, and Mac App Store.

        1.Creating an Apple ID account on iPhone


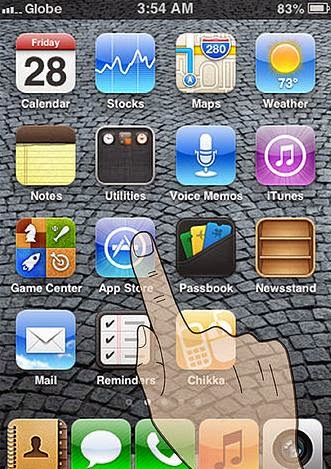
        2.The very first thing, you need to do on your iPhone is find and open the App Store. You can locate App Store icon in blue color that contain the letter ‘A’ surrounded by a circle.


        3.Next you need to browse and find the app you want to download. There are different categories like new apps, popular and frequently downloaded apps, featured apps, the current top 25 apps, or view apps by category for easy browsing. You can also directly search the apps you want to download by tapping on the search bar and typing the keywords or app name

        4.Once you find the app you’re looking for, tap on it to view the details. The details of app may include complete description of the app, developers name or company, its price if not available for free, along with reviews and ratings provided by other iPhone users.


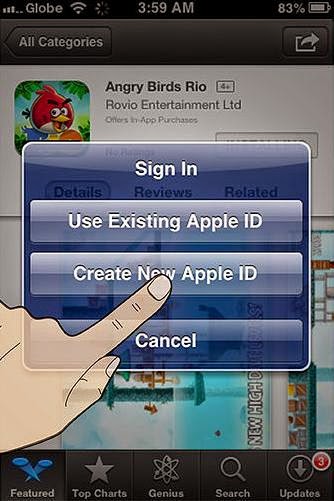
        5.You then must tap on install button to install the app on your device. When you do that a new window appears telling you to sign in or create a new Apple ID. Proceed with create new Apple ID, fill in the necessary details and then tap Done.


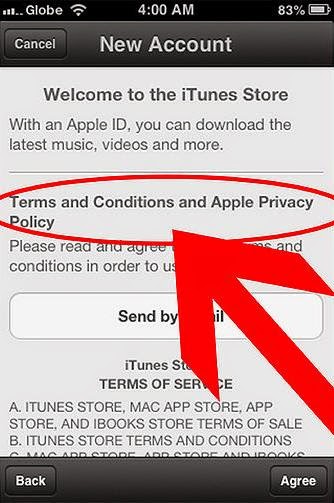
        6.You’ll need to read the Terms and conditions of Apple App Store and click on Agree button located at the bottom of the page to proceed.


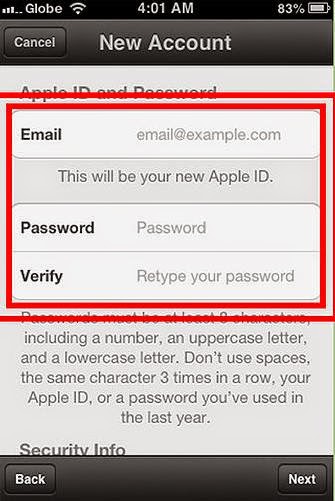
        7.Next you need to enter your email address, birthday, answer security question, and create your password.


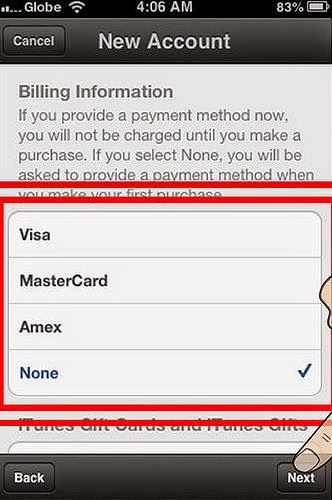
        8.After that you need to select the mode of payment for paid apps and none for free apps and tap next.


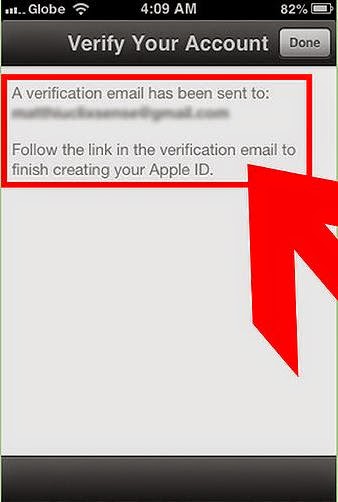
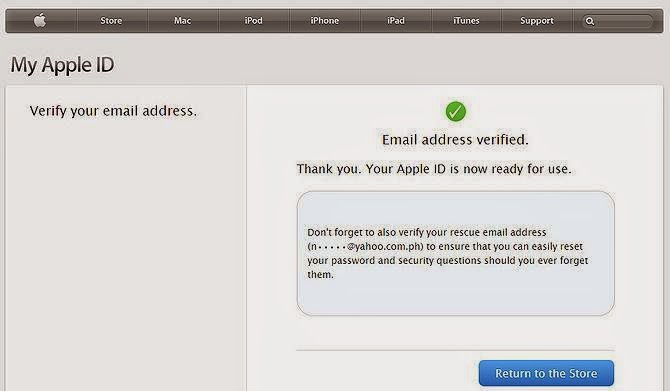
        9.Now you will see a new window asking you to verify your account. You need to check your email to activate your account. And when you tap on the link you will automatically prompted to sign in with your account and password.


        10.Once you do that, you have successfully created an Apple account and can now download the apps and enjoy iTunes, iBookstore and App store on your iPhone, iPad or iPod.


        Available link for download

        Read more »

        Friday, May 26, 2017

        How to Add an Account on Windows

        How to Add an Account on Windows


        How to Add an Account on Windows


        Maintaining separate user accounts on your Windows PC allows you to keep separate identities, preferences, and file systems on the computer for each user. Adding or deleting an account on Windows is easy!

        Adding an account.

        1.Go to your Start menu.

        2.Go to you Control Panel.

        3.Select User Accounts And Family Safety.

        4.Click on "Add Or Remove User Accounts."

        5.Select "Create User Accounts."

        6.Type in user account name. Also you will need to decide if whether it will be a Standard Account, or Administrator Account.  
        • Standard Account users can use most software and change system settings that do not affect other users or the security of the computer.
        • Administrator Account users have complete access to the computer and can make any desired changes. To help make the computer more secure, administrators are asked to provide a password or confirmation before making changes that affect other users.
        7.You are done!
        • If you want to make any personal changes like set up a password, change profile picture, or put on parental controls, just click on your name.


        Available link for download

        Read more »

        Thursday, May 25, 2017

        Linking SBI Bank Account with Aadhaar Card

        Linking SBI Bank Account with Aadhaar Card


        Linking Bank Account with Aadhaar Card have become mandatory sue to various schemes, and subsidies implemented by Government of India it is necessary to have your Bank Account linked to your Aadhaar Card.

        So here we will be guiding you with how to link your State Bank of India Bank Account with your Aadhaar Card. First of all you will need following documents.

        You’re Aadhaar Card with 1 Photocopy of it

        You’re State Bank of India Account Passbook with 1 Photocopy of it

        You will need to carry original document as well as Photocopy

        Just download the form, from here to link your SBI Account to Aadhaar Card


        The Bank Account should be Savings Account and no other type of Account

        After you download the letter of Bank Account linking with Aadhaar Card, just fill it and submit it to your State Bank of India Branch with the photocopies of document’s enclosed above.

        After Submitting all documents the Bank employee will tell you further process.


        Also Read: Check Aadhaar Status - Resident Portal

        Available link for download

        Read more »

        Wednesday, May 10, 2017

        Banking tips that should be aware Account knowledge

        Banking tips that should be aware Account knowledge


        • Know the fees associated with your account. Ask what types of fees to expect and how you can avoid them. They creep up, and your bank might not prepare you for new fees either. For instance, large banks like Bank of America are instating monthly fees for debit card usage. While charges are between $3-$5, its still a pretty significant fee for debit card users.
        ___________________________________________________

        Banking And Financial Awareness (Covering General Banking & Socio-Economic Awareness) IBPS Bank PO/SO/MT,IBPS Clerk,RRBs Office Assistant & Officer Rbi,SBI PO & Clerk
        ___________________________________________________
        • Your purchasing habits are stored. In the ever-connected modern day world, purchases made by debit and credit cards are stored and analyzed. This might not mean a whole lot to you in terms of your debit card usage, but companies could use the data to determine your interest rates for credit cards. Keep that in mind if you tend to make not-so-responsible choices like purchasing huge items spontaneously or blowing your paycheck in a 24-hour period. Otherwise, opt to make more cash purchases.
        • Limit the amount of transfers you make. I had a lot of savings from working during college, but I quickly drained those resources in the real world and racked up killer transfer fees. Banks obviously want you to keep your money in the bank, so budget yourself before you transfer money out of the account. This way you arent forced to pay more fees than necessary.
        • Save, save, save! In your 20s, its a day-to-day financial struggle; I get it! While its difficult to think about the future or prepare for natural disasters, accidents, or injuries — they happen! Be adamant about setting aside a certain amount every paycheck. Shoot for 10 to 15 percent, but anything is better than nothing, even if its $20.
        • Check your checks. Debit card purchases appear on your account immediately, whereas checks can take up to a week to be cashed. In that time, the lattes add up; the account is drained; and its a pain (and financial drain) to deal with a bounced check.
        • View your account history daily. Save your receipts and double check the charges on your online banking. Theres nothing worse than a hefty overdraft fee due to negligence. Everyone makes mistakes, but youre better off (and richer too) if youre the one catching them.

        Available link for download

        Read more »

        Tuesday, May 9, 2017

        How Can I Delete My Facebook Account Permanently

        How Can I Delete My Facebook Account Permanently


        How Can I Delete My Facebook Account Permanently


        Sometime back one of my friend asked me “How can I delete my Facebook account permanently, whenever I am trying to delete, it is getting activated again”. So this post will answer that question and will explain why it was getting reactivated again.

        Facebook allows you to temporarily deactivate your account which will hide all your information on Facebook from others that means no one will be able to access your information on Facebook. But this does not permanently delete your Facebook account, whenever you want you can again re activate your account and you can see all your data as it was. But what if you want to delete your Facebook account permanently?

        This article will guide you on how to permanently delete a Facebook account with some other tips that need to be taken care before and after deleting your Facebook account. 

        Steps to delete Facebook account permanently


        There are some important things that you need to double check before deleting your Facebook account.
        Recheck the below points before deleting Facebook account

        1. Take a backup of your Facebook data before deleting the account; it may be useful in future.
        2. Make sure that you check all services wherever you use Facebook Connect to login to the account, wherever possible try to create your login account with that service and avoid using Facebook Connect to login.
        3. Check all the plugins for your browser which auto login to your Facebook account, if possible disable or uninstall them.
        4. Check all your mobile devices apps wherever you use your Facebook account. If possible uninstall them or disable them so that they cannot use your Facebook account.
        5. Remove all of your linked account with Facebook one could be the Twitter. This will prevent you from accidental to your Facebook account after deleting the account.
        Now you must be thinking why do I need to take care of the above things? The answer is after you delete your Facebook account permanently the system takes 10-14 days to delete all your data completely and if you try to login to your account within this period your Facebook account will be re activated again.

        The Process to delete Facebook account:
        1. First of all Login to your Facebook account.
        2. Access the Facebook’s account delete page and click on the Submit button.
        3. Now when it pops up a confirmation message, enter your password and validate the captcha image and click on the ‘Okay’ button and follow the rest of the instructions.
         
        After submitting the account deletion process successfully you will get an email from Facebook saying “Your account will be deleted in 14 days”.


        Things to be taken care after successfully submitting the account deletion request:
        As already I have told that after deleting your account if you try to login to your account before all data is deleted from Facebook system, your account may not be deleted and may be reactivated. So you need to take care of the below points after submitting the account deletion request.   
        1. Do not try to login to your Facebook account at any point of time by any means.
        2. Do not use Facebook connect service to login to any websites.
        3. Do not click on Facebook ‘Share’ or ‘Like’ button on any website.

        If you follow all of the above process you Facebook account will be permanently deleted after 14 days. After permanent deletion you will get an email from Facebook regarding the deletion of account. To confirm it you can login to your account and if you are unable to login, your Facebook account has been deleted permanently.

        Available link for download

        Read more »

        Wednesday, April 19, 2017

        Paypal Par Account Kaise Banaye Puri Jankari Hindi Me

        Paypal Par Account Kaise Banaye Puri Jankari Hindi Me


        Paypal Par Account Kaise Banaye Puri Jankari Hindi Me

        hello dosto aaj hum paypal par account banana sikhege
        paypal ek online bank hai jisme hum paypal par online paisa dal sakte hai aur usme se paisa nikal bhi sakte hai paypal par daily crorero rupee har rog transfer karta hai aur nikale bhi jate hai paypal ko abhi 190 deso me chalaya jata hai paypal ko 1998 me banaya gaya tha tab se ye chal raha hai aur agar aap online bisiness karte hai to aapke liye paypal par account hona bahut jaruri hai aur agar aap paypal par account banana chahte hai to aap hame step by step follow kare

        paypal-account-kaise-banaye-ka-image

        paypal account banane ke liye kin kin chijo ki jarurat hai

        sabse pehle hum ye janlete hai ki paypal par account banane ke liye hame kin kin chijo ki jarurat padti hai?

        1: email id> paypal par account banane ke liye aapko ek email is ki jarurat padti hai

        2: pan card> aapko paypal account banane ke liye pancard ka bhi jarurat padta hai

        3: creadit/debit card> aapke pass debit card ya creadit card bhi hona chahiye

        4: address> aapka address bhi dalna hai aap apna original address dena hai

        5: bank account> bank me account bhi hona jaruri hai

        6: mobile number> aap apna hi mobile number dena hai

        paypal account kaise banate hai

        1: paypal par account banana bahut hi aasan hai aapko  paypal.com par jana hai uske bad aapko SIGN UP ki bittom par click kare phir aapke samne ek form ki list khul ke samne aajayegi usko aap atche se fill karle

        paypal-ragister-form-menu-ka-image

        2: ab sabse last me aapko agree and create ki buttom par click karde

        3: ab aapse agle page me code ko sahi se dalna hai taki agle page par jaa sakte


        4: ab aapka paypal account ban chukka hai
         
        ab aage ki settings mai aapko step by step batata hu

        step 1: sabse pehle aapko apna paypal account ko conform karna hoga conform karne ke liye aap apna email ko kholker conform email par click karde usper conform email ka aaya link hoga

        step 2: conform email par click karte hi aap paypal par login karne ka option dega aapko apna paypal password dal ke login par click karde

        step 3: ab aapke samne paypal account ki security ke liya question select karna hai uske bad uska ans dene ke bad aapko submit ki buttom par click karna hai


        step 4: ab aage aapko ek notification aapko dikhega usper aap click kare

        paypal-account-update-list-ka-image


        step : ab aapko apne account ko update karna padega pan pancard,bank account number aur aapko ye bhi batana hai ki aap aapna account kyo aur kisliye bana rahe hai
        sabko atche se fill karde phir save karde ab aapka paypal account ban chukka hai paise kamane ke liye aur apne bank me paise transfer karne ke liye

        ALSO READ>

        online paise kamane ke liye website kaise banate hai
        apne mobile me 200 se jyada daily kaise kamaye
        youtube ki special tricks jo aap nahi jante
        Apne mobile ka number use kiye bina whatsapp kaise chalaye
        agar aapke computer ka windows expire ho chuka hai aap yaha click kariye
        agar aap apne computer ke ram ko bina kisi softwere ke jyada karna sikhea
        agar aap apna computer fast karna chahte hai to yaha click kare


        to dosto mere khyal se aapka paypal account banker tayar ho chukka hoga agar aapko kahi pe bhi dikkat aati hai to aap hame comment karke puch sakte hai aur bhi aise hi tricks pane ke liye aap hamare site ko subscribe jarur kare like bhi kare

        Available link for download

        Read more »

        Monday, March 27, 2017

        How to Deactivating Facebook account

        How to Deactivating Facebook account


        Guys here know how to deactivating FB account Many of you people might not know how to deactivate a Facebook account. So here goes the process.

        1. Login into your Facebook account.

        2. Click On Account Setting.
        3. Click On Security Settings
        4. Under all the settings, you will find an option Deactivate Your Account. Click On it.

        5. It asks you the reason for leaving. Just enter it. Then click on Confirm. It asks your Password. Enter it and youre done.


        NOTE : After deactivating your account, if you want to claim it back again you can directly log in into your account as usual. Youll get back your account as it was when you deactivated it.

        Available link for download

        Read more »

        Saturday, March 25, 2017

        How to Check Account Balances using an ATM

        How to Check Account Balances using an ATM


        Do you want to know your bank account balances ? Then dont need to go to your bank, only you have to go to your nearby ATM. In this post I show you how to check account balances using an ATM.


        Step 1.
        Go to your nearby ATM and insert your card to the ATM machine.


        Step 2.
        Now Select your language from menu.


        Step 3.
        Now enter your ATM or Debit cards PIN number.


        Step 4.
        Now from the main menu Select Balance Enquiry option.


        Step 5.
        ATM screen will show various types of accounts. Select your account type that may be saving or current.


        Step 6.
        Now a new screen appear here you can see your account balance.


        -------------------------------------------
        Read also
        ?How to Withdraw Money from ATM Machine 7steps
        ?How to Change ATM or Debit cards PIN number 7 steps
        ?How to Use Banks ATM to Deposit Money in ATM Machine with an Envelope
        ?How To Deposit Money In A Cash Deposit Machine
        ?How to use Debit Card for Online Payment 5 Steps

        Available link for download

        Read more »

        ZbigZ Premium Account GIVEAWAY

        ZbigZ Premium Account GIVEAWAY


        We are glad to announce Giveaway of Premium of ZbigZ Premium Account for all our blog readers for lifetime. So below we have arranged a ZbigZ Premium Account Giveaway for all our readers.

        Giveaway of Premium Account
        Login: premiummem@gmail.com
        Pass: nobitasworld)(*&^%$#%^&

        If Password gets changed the same will be updated here. If it was helpful to you please do share, comment, and like this post. 

        Available link for download

        Read more »

        Friday, March 17, 2017

        Aadhar can before long be a universal document for Opening Bank Account

        Aadhar can before long be a universal document for Opening Bank Account


        The Reserve Bank India issued a notification stating the formally valid documents for gap checking account. run batted in has revised the grasp your client pointers with the governments interference of cash wash norms.

        The list of valid documents includes Aadhar Card, PAN card,licence, passport, or the NREGA card. This list is comparable to the previous solely the modification is the other document as is also needed by the institution|bank|banking concern|financial institution|financial organization|financial organisation} or financial institution or treater is replaced by any document notified by the central government.

        It has been reported that before long Aadhar can become a universal document for gap a checking account. itll be simple for the purchasers currently to open the account with Aadhar Card. Most of the un banked client might not have the opposite 5 valid documents. With the Aadhar Card currently the minors can even simply open their account.

        Available link for download

        Read more »

        Thursday, March 16, 2017

        Link Aadhar to Bank account online

        Link Aadhar to Bank account online


        Today, the Indian Government is planning to make Aadhar Card necessary for most of the legal and Government administrative procedures – along with encouraging people to link their Aadhar to their bank accounts. But even today many people are not aware of or are confused how to link Aadhar to bank account online. It is a very easy process to link Aadhar with your bank account and it just take a couple of minutes to add details of Aadhar to your bank account – you just need to follow the below mentioned simple procedure. The methods or processes are almost similar and applicable to all banks like STATE BANK OF INDIA (SBI), ICICI, HDFC, UBI etc.

        Image result for link aadhar to bank
        ??Ways to link Aadhar to bank      account online :

        (Online method) Add details of Aadhar to your bank account via the net banking portal of your bank.
        Linking Aadhar to bank account can be done by updating the Aadhar details online i.e. via internet banking or the net banking portal of your bank. If your account does not have internet banking enabled, I think this is a good time to enabled net banking for your account. Just visit the nearest branch of your bank and ask for an Internet Banking form. It is very simple to fill this form and just within a couple of days, you will receive the details of your username and password for your internet banking right at your postal address (as per the records of the bank).

        If you already have net banking enabled for your bank account, proceed further to link Aadhar to bank account:
        1. Now you need to login into your net banking account.
        2. Once you are logged in, you will find the option or link as ‘Update Aadhar Card Details’ or ‘Aadhar Card Seeding’.
        3. Now click the link to open the other page
        4. Now bank will ask for some basic information about your Aadhar Card. Enter the details required details correctly.
        5. After entering the details submit this information by hitting the Submit Button.
        6. Once you submit the details, it will be saved to the respective bank database.
        7. After that, bank will verify the information the details of your Aadhar (they have an access to UIDAI data) and link the Aadhar to your bank account.
        8. You would be informed or notified either through email or SMS to your registered email address or phone number once this process is completed. Also National Payments Corporation of India (NPCI) has provided the facility to check Aadhar- bank account linkage by dialing *99*99# on mobile phones at the cost of Rs. 1.50 per enquiry.


        (Offline method) Add details of Aadhar to your bank account by submitting a form to your bank. You can download this form either from your bank’s website or visit the nearest branch of your bank and ask for the Aadhar to Bank Account Seeding Form:


        Available link for download

        Read more »