Showing posts with label restore. Show all posts
Showing posts with label restore. Show all posts
Wednesday, June 21, 2017
How to Restore Your Computer
How to Restore Your Computer
How to Restore Your Computer
When a newly-installed program goes haywire and starts wreaking havoc on your system, it can be frustrating trying to get your computer back under your control. Luckily, theres a solution available for both Windows and Mac users that keeps your files intact while rolling back any negative system changes. Follow this guide to learn how to restore your Mac or PC.
Method 1:- Restoring Windows

1.Understand how the restore process works. Windows creates a system restore point every 7 days, and every time a new Windows update is installed. Windows can roll back to previous settings without affecting any files you have edited or created since then.
- System Restore does not backup files, so it can’t be used to recover files that have been deleted.
2.Launch System Restore. Open the Start menu and type System Restore into the search bar. Select System Restore from the list of programs. Close any programs that may be running on your computer during the restore process.

3.Select the restore point. System Restore will present you with a calendar or a list containing the restore points on your computer. Select a restore point from before your computer began malfunctioning and click Next.

4.Wait for the restore process to finish. Once the restore process is complete, Windows will reboot the computer.
Method 2 :- Restoring Mac OS X

1.Understand your recovery options. Mac has several different recovery options, but in order to perform a restore, you must have previously configured a Time Capsule backup. Otherwise, your options are limited to repairing the hard disk or formatting and reinstalling a fresh copy of OS X.

2.Configure a Time Capsule backup. Connect an external hard drive to your Mac that is equal or greater in size to your Mac’s internal hard drive. If you have never set up a Time Capsule before, OS X will ask if you want to configure the newly connected drive as one. Select Use as Backup Disk.
- Select “Encrypt backup Disk” if you want to add password protection to your backup file.

3.Wait for your backup to complete. You can schedule automatic backups and specify specific files in the Options menu.

4.Restore a Time Machine backup. Reboot the Mac and hold down the Command key + R while the system boots up. This will open the OS X Recovery Tool. From here you can pick your recovery option. Select Restore From Time Machine Backup to load your latest disk image from the external drive.
- If you have multiple backups stored on the Time Capsule, you will be given a list to choose from. Pick one from before you started having issues with the computer.
- Unlike System Restore in Windows, you can use a Time Capsule backup to retrieve files that were deleted in the past, as long as you have a backup from when the file existed.

5.Restoring without a Time Capsule backup. If you don’t have a Time Capsule backup, then the only way to restore OS X is by formatting and reinstalling. You can do this from the OS X Recovery Tool. Press Command+R while rebooting the Mac. Select Reinstall Mac OS X.
- Note: You will need to be connected to the internet in order to successfully reinstall your copy of Mac OS X without the disc.
- Reinstalling the operating system will delete all of your saved data, programs, and settings.
Available link for download

Tuesday, May 23, 2017
How to take Backup or Restore of Blogger template
How to take Backup or Restore of Blogger template
How to take Backup or Restore of Blogger template
 Today I am going to explain you a simple article about the backup of template from Blogger. Most of the people think that there is no need to take any backup of the template. For this reason I am going to explain you how to take backup of the template ? It is strongly recommend by me or most of the web developer that backup of the template is necessary whenever you are interested to edit it.
Suppose you dont know HTML, CSS or XML like languages and make some mistake in blogger template without any backup then it will provide a great hesitation to you because there is no way to recover that template again. So backup of the template is the only key to protect template from losses.
There are two methods to take backup of the template. We will discuss both two methods here.
Method 1:-
How to restore template from Backup:-z
Method 2:-
Why take backup of template:-
How to Take Backup of the Template:-
Method 1:-
- Login to Blogger Dashboard.
- Go to Design / Edit HTML.
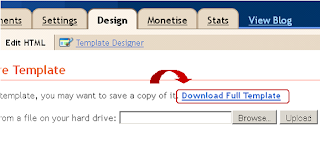
- Click "Download Full Template"
Save file (.xml) in your local computer.
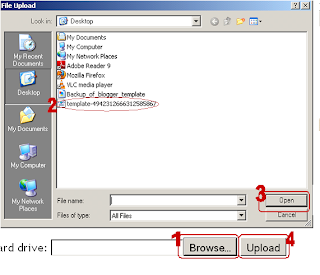
How to restore template from Backup:-z
- Click "Browse" button and open file saved in step 4.
- "upload" button.
- AHit nd finally you have done.
Method 2:-
Generally this is not a predefined method but this is preferred by most of the Web developer.
Hit "Expand Widget Template".
Select and copy the whole blogger template.

And Paste the whole code in any text editor like notepad or wordpad.
I think this article will definitely helpful for you. If you like the above article then dont forget to subscribe it for latest updates.
Hit "Expand Widget Template".
Select and copy the whole blogger template.
And Paste the whole code in any text editor like notepad or wordpad.
I think this article will definitely helpful for you. If you like the above article then dont forget to subscribe it for latest updates.
Available link for download
Saturday, May 6, 2017
How to Delete System Restore Files
How to Delete System Restore Files
How to Delete System Restore Files
System restore allows you to set your computer back to a previous date when it was working correctly if something goes wrong with your system that you cannot reverse. You may want to delete system restore files to free up disk space on your drive. Here are some steps to delete old system files and to turn system restore off on your system.
Method1 :- Delete All Old System Restore Files, Except the Most Recent
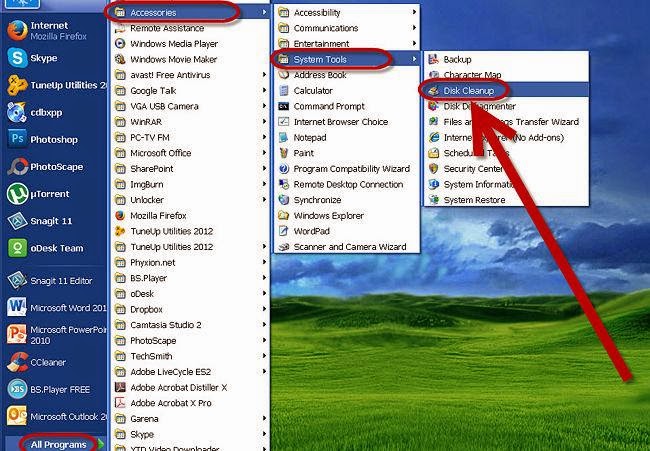
1. Access the main menu by selecting "Start." Hover your cursor arrow over "All Programs," then the folder titled Accessories, and then System Tools. Click on the program called "Disk Cleanup."
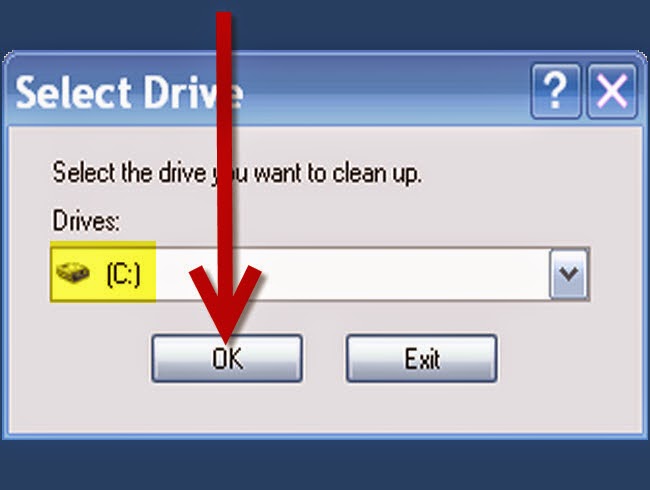
2.Choose the "(C:)" drive from the drop-down menu and then press "OK."
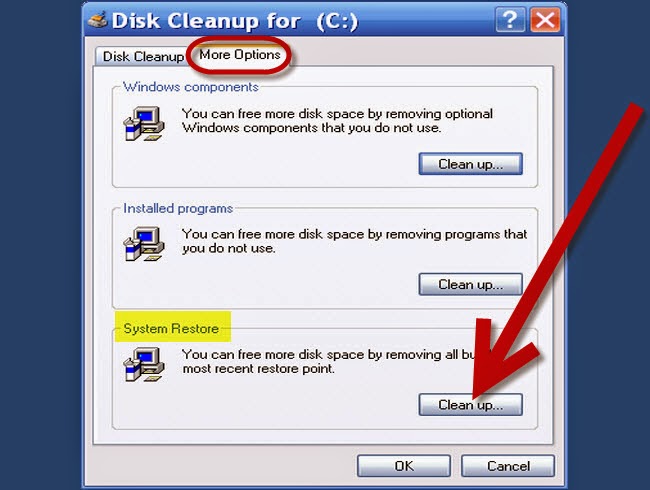
3.Choose the tab marked "More Options" once Disk Cleanup has finished running its task. Under the heading "System Restore," click on the "Clean up" button.
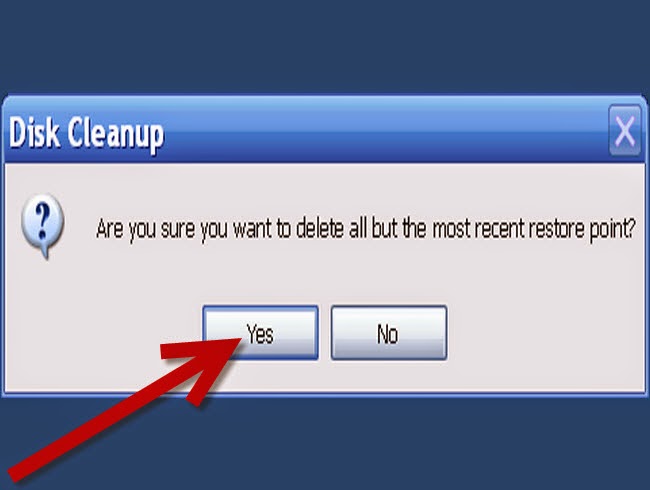
4.Choose "Yes" on the dialogue box to delete all old system restore files, except for the most recent.
- Windows will continue to create new restore points after running this task, so if you would like to frequently free up space on your drive, you will need to perform the process regularly.
Method2 :- Delete All System Restore Files and Turn System Restore Off in Windows 7
1.Access the main menu by selecting "Start," place the cursor over Computerand press the right mouse button, then choose "Properties."
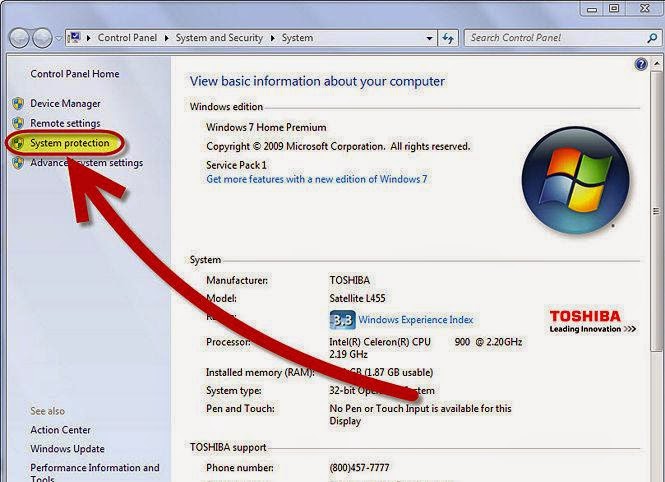
2.On the left-hand side of the window, choose the link called "System protection."
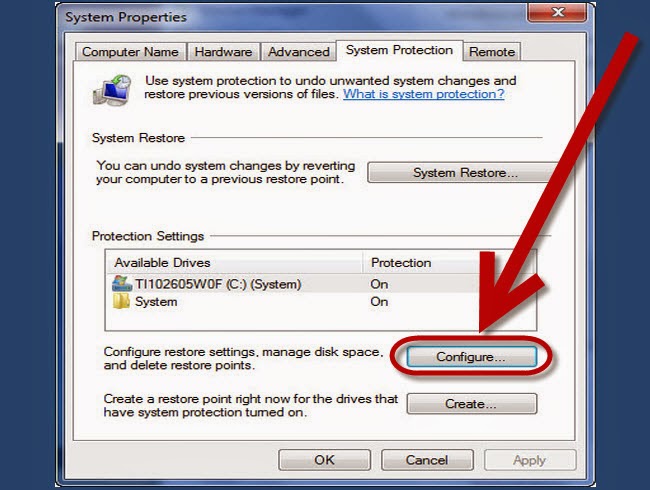
3.Choose the button marked "Configure,"
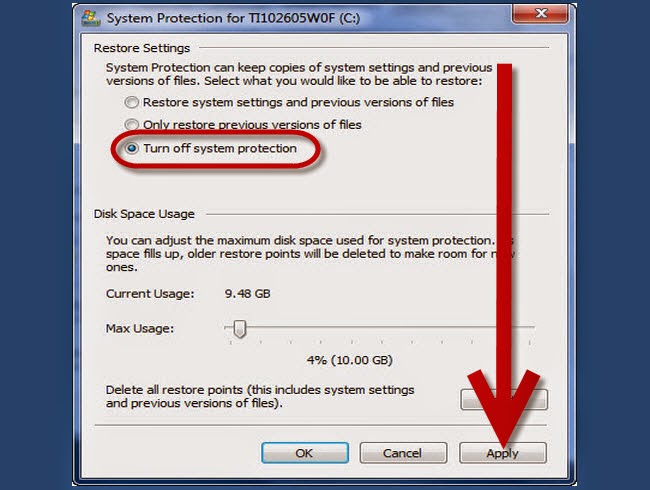
- Select the button next to "Turn off system protection" and click "Apply".
Available link for download
Subscribe to:
Posts (Atom)