Showing posts with label take. Show all posts
Showing posts with label take. Show all posts
Tuesday, May 23, 2017
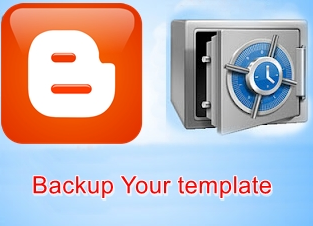
How to take Backup or Restore of Blogger template
How to take Backup or Restore of Blogger template
How to take Backup or Restore of Blogger template
 Today I am going to explain you a simple article about the backup of template from Blogger. Most of the people think that there is no need to take any backup of the template. For this reason I am going to explain you how to take backup of the template ? It is strongly recommend by me or most of the web developer that backup of the template is necessary whenever you are interested to edit it.
Suppose you dont know HTML, CSS or XML like languages and make some mistake in blogger template without any backup then it will provide a great hesitation to you because there is no way to recover that template again. So backup of the template is the only key to protect template from losses.
There are two methods to take backup of the template. We will discuss both two methods here.
Method 1:-
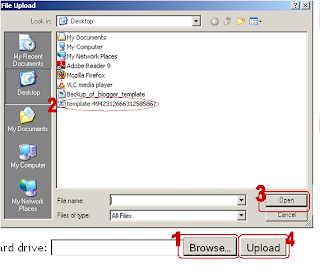
How to restore template from Backup:-z
Method 2:-
Why take backup of template:-
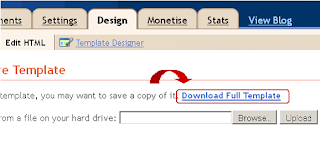
How to Take Backup of the Template:-
Method 1:-
- Login to Blogger Dashboard.
- Go to Design / Edit HTML.
- Click "Download Full Template"
Save file (.xml) in your local computer.
How to restore template from Backup:-z
- Click "Browse" button and open file saved in step 4.
- "upload" button.
- AHit nd finally you have done.
Method 2:-
Generally this is not a predefined method but this is preferred by most of the Web developer.
Hit "Expand Widget Template".
Select and copy the whole blogger template.

And Paste the whole code in any text editor like notepad or wordpad.
I think this article will definitely helpful for you. If you like the above article then dont forget to subscribe it for latest updates.
Hit "Expand Widget Template".
Select and copy the whole blogger template.
And Paste the whole code in any text editor like notepad or wordpad.
I think this article will definitely helpful for you. If you like the above article then dont forget to subscribe it for latest updates.
Available link for download
Tuesday, May 16, 2017
How to Take Screenshots on Samsung Galaxy with Your Palm
How to Take Screenshots on Samsung Galaxy with Your Palm
How to Take Screenshots on Samsung Galaxy with Your Palm
Taking screenshots is a quick, useful way to save whatever is displayed on your device screen into a static digital image, which is then filed away in your phone’s Gallery. Also called a “screen grab” or “screen capture,” a screenshot can display something that would be difficult to explain in words, highlight a problem when troubleshooting, explain a specific screen to your audience, illustrate a process, and save configuration settings for later use. Whether you want to capture something humorous on Facebook, your favorite teams match schedule or a recipe perhaps, screenshots offer an easy way to save and share things. If you’re using a Samsung Galaxy device, you can even take screenshots with just a swipe of your palm.
Taking Screenshots Using Your Palm

1.Place your palm vertically on one side of your device. Once you’ve decided to capture a particular display, slowly swipe your hand across to the other side of the screen, either left to right or right to left.

2.Remember to keep your palm in contact with the screen at all times. If not, your screenshot might not be captured clearly or at all.

3.Wait for the “you’ve saved a screenshot” message. You will see it on your device screen if the screen capture was successful.

4.Check the screenshot. To see if the captured image is to your liking, pull down the notification bar, look for the item labelled “Screenshot captured,” and tap on it.
- Alternatively, you can also go to the Gallery in your device, and check in the Screenshots folder.
Available link for download
Tuesday, April 18, 2017
How to Take Aadhaar Card Print Out Online
How to Take Aadhaar Card Print Out Online
If you have still not received your Aadhaar Card through post you can take Aadhaar Card Print out online in few simple easy steps. So in this article we will guide you throughout the process on How to Take Aadhaar Card Print out Online.
First of all to be able to Take Aadhaar Card Print out Online you should have your Aadhaar Card Enrollment Acknowledgement Slip or your Aadhaar Card Number, and if you have these details or documents available with you than in few clicks you will be able to print your Aadhaar Card Online.
You can take print out of your Aadhaar Card Online by Aadhar Card Print out Online by Aadhaar Number or Aadhar Card Print out Online by Aadhaar Enrollment Number.
Steps on How to Take Aadhaar Card Print out Online (Aadhar Card Print out Online by Aadhaar Number or Aadhar Card Print out Online by Aadhaar Enrollment Number)

Your downloaded e-Aadhaar PDF will be valid as the original Aadhaar Letter.
Also Read: How to Get Aadhar Card Print Out Offline
First of all to be able to Take Aadhaar Card Print out Online you should have your Aadhaar Card Enrollment Acknowledgement Slip or your Aadhaar Card Number, and if you have these details or documents available with you than in few clicks you will be able to print your Aadhaar Card Online.
You can take print out of your Aadhaar Card Online by Aadhar Card Print out Online by Aadhaar Number or Aadhar Card Print out Online by Aadhaar Enrollment Number.
Steps on How to Take Aadhaar Card Print out Online (Aadhar Card Print out Online by Aadhaar Number or Aadhar Card Print out Online by Aadhaar Enrollment Number)
- To download electronic version of your Aadhaar open your web browser on your computer or laptop and visit https://eaadhaar.uidai.gov.in/.
- Once you are on the e-Aadhaar download page just select I have enrollment number or aadhaar number (according to which details you have with you), enter the Enrollment Number/Aadhaar Number in the below field and other details like Full Name, Pin Code, Solve the Image by typing it in below text field, mobile number and hit on get one time password.
- Once you receive one time password on your registered mobile number just enter the OTP received on your mobile number in below enter OTP field and click on validate and download.
- Once you hit on validate and download your e-Aadhaar PDF file will get downloaded on your computer or laptop.
- Make sure you have Adobe PDF Reader Installed on your Computer or Laptop and open the e-Aadhaar Card PDF downloaded. Once the Aadhaar Card PDF document opens up with Adobe PDF Reader it will ask you to enter the password to view your Aadhaar Card PDF.
- Password to open your Aadhaar Card PDF will be your address postal code, once you enter the password you will be able to view your Aadhaar Card PDF.
Your downloaded e-Aadhaar PDF will be valid as the original Aadhaar Letter.
Also Read: How to Get Aadhar Card Print Out Offline
Available link for download
Sunday, March 26, 2017
How to Take Screenshots on a Mac with Apowersoft Mac Screenshot
How to Take Screenshots on a Mac with Apowersoft Mac Screenshot
How to Take Screenshots on a Mac with Apowersoft Mac Screenshot
Generally speaking, people who shift from Windows to Mac are often confused about the method for Print Screen, since the shortcut key to take a screenshot on Mac is different from Windows. While a combination of "Command + Shift + 3 or 4" shortcut keys will allow you to take screenshots on a Mac, the problem that arises is that captured content cannot be edited. To work around this, you can use the third-party tool Apowersoft Mac Screenshot. This tutorial will instruct you on how to take screenshots on a Mac more efficiently.
Method 1 :- Taking the Screenshot
1.Launch the application and preset the options. Open the official website and click "Download Desktop Version" button to download and install the application. A thumbnail of its icon will appear at the top menu bar once you launch it, just left click it and select "Options" in the drop-down menu, then you can enable your preferred keyboard shortcuts and choose the desired image quality.
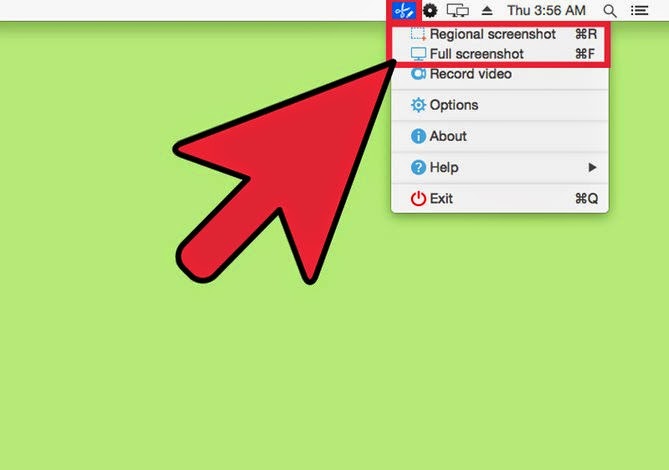
2.Select a capture mode. Full screenshot and Regional screenshot modes are both available for this application––select the one you need and begin to grab your screen.
- Full screenshot mode will capture the whole desktop and automatically save to the target output folder.
- Regional screenshot enables you to customize the capture area, just drag your mouse cursor to snap the content and then let go of it when the capture is finished.
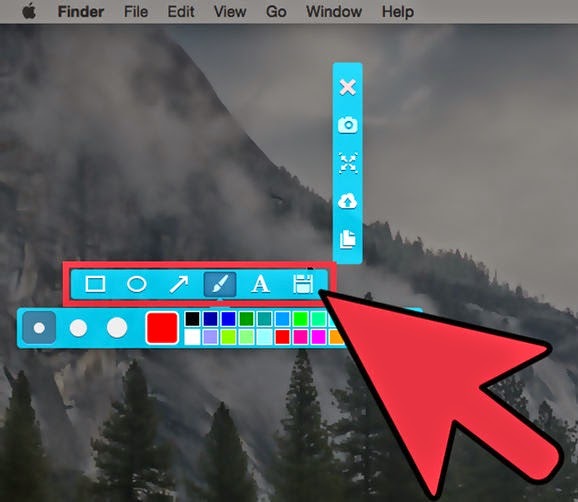
3.Edit the captured image with the editor bar. Once the screenshot area is confirmed, an editor panel will show next to the border. You can draw shapes, arrows, add text, or highlight with a marker pen, as needed.
Method 1 :- Sharing and saving the screenshot
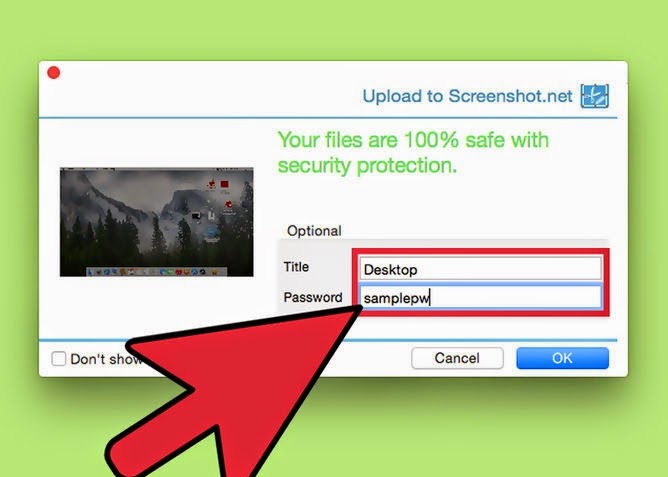
1.Upload the screenshot to cloud storage (optional). This will help you to see the screenshot on a different computer. Just click the cloud icon and upload the captured image to the free cloud space, then you can download it, anytime and from anywhere. You can also key in a password to stop others from accessing it.
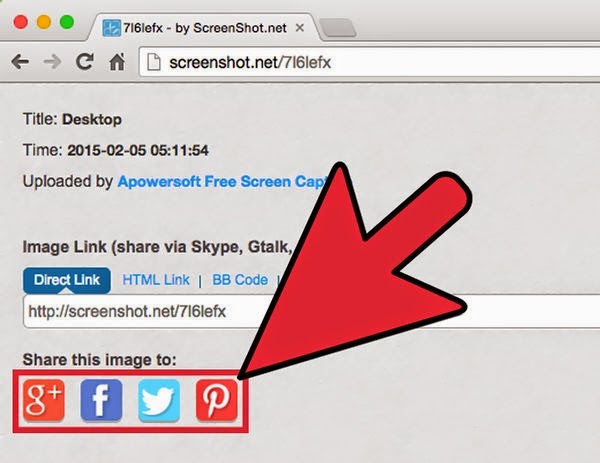
2.Share the image to social media (optional). You can share the image to a social network after uploading it to free cloud space. There are various social media sharing options available, such as Google+, Facebook, Twitter, and Pinterest. Just select one, then the uploaded image will be automatically shared to your personal account.
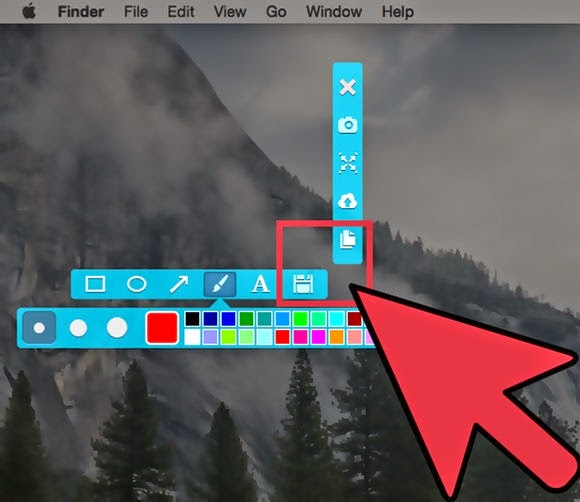
3.Save the image or copy to the clipboard. There is a thumbnail of disk icon on the horizontal editor bar and a piled paper icon on vertical, you can click the first icon to save the captured image to your local disk, or hit the vertical one to copy the captured content to clipboard, and then paste to WordPad or anywhere else.
Available link for download
Subscribe to:
Posts (Atom)